Hello!

Xaudia offer microphone re-ribboning and repair services.

2022/11/18

Decca Ribbon Tweeters part 2

Last week I posted about repairing some vintage Decca London ribbon tweeters. I was confident that I had done a good job but was unable to do listening tests in context as I only had the tweeters to play with. These are now back with Andy, their owner, who kindly sent in his impressions and some photos. Overall I think we have done a good job and it's a nice feeling to have helped get these back up and running.

Decca Volt speaker with ribbon tweeter

"The [new] ribbon sounds smooth, crisp and clear with no tizz or distortion. I ran it for a while at different volumes and with different music and it sounds excellent with everything I gave it. It is very close in sound to the original in the other speaker with the soundstage being in the middle and correct. I had to try hard to notice a difference, Bob Marley's Is This Love has some high frequency cow bell drum noises and you could hear they were slightly crisper and louder from the new ribbon. The crossover point in the Volt's is about 1200hz so any imbalance between the two tweeters is easily heard as the singer tends to move off centre.

New ribbon installation at Xaudia

"I think the differences could be classed as being between an old and new ribbon the sound from them is so close. I assume as the new ribbon breaks in it will soften in sound a bit. I am tempted to switch the other new ribbon in as well.

Andy's impressive hi-fi setup.

"Considering the lack of info on the ribbons I thought getting a close match sonically was not good but it's turned out to be very close indeed. It is a huge relief to know that if a ribbon gets damaged again I can get help.

"I am not sure but you might get a lot of interest, when I was trying to find someone to repair my ribbons I came across a huge amount of forum posts on the same issue dating back about 5 years. Nobody had managed to find anyone so in theory there are a lot of ribbons to repair out there."

Thanks to Andy Mcgregor.

2022/11/13

STC 4136 revisited

STC 4136 microphone

A long time ago I posted about the STC 4136 condenser microphone and how to modify it to work on standard 48V phantom power, using a small circuit built on perfboard.

STC 4136 microphone, in pieces.

I had another opportunity to work on one of these microphones. This one was a challenge as it had no circuit inside at all, just the capsule and bodywork, although that also gave free scope to start from scratch.

STC 4136 microphone capsule.

Space is tight in this microphone, but with a careful layout and small components everything will fit neatly. My solution for this one was to fit a small KM84 circuit and Neutrik NTE10/3  transformer. This transformer performs well, does not break the bank, and can be squeezed into tiny spaces where nothing else will go. 

New circuit board and transformer

This time I commissioned a printed circuit board rather than working on perfboard, which does save time and look more professional. The board will be useful for other projects too - I have a handful of other small microphones which would benefit from updated, lower noise circuits.

Made in England


Thanks to Robert at Russell Technologies for the board layout and advice.

Decca Ribbon Tweeters part 1

Decca London ribbon tweeters with huge transformers.

I have not repaired speakers in the past, but I recently had my arm twisted to look at some vintage Decca London ribbon tweeters. In theory they work in a similar manner to a ribbon microphone and should not present too much of a challenge.... right???? Anyway, it is nice to see something different on the bench and maybe I will learn something in the process.

The horn of a Decca ribbon tweeter

The first challenge was to take the speakers apart and work out what is going on inside. They have a large horn with two vents, which is is held in place with six screws. With these out of the way it is possible to remove the large, powerful magnet assembly and ribbon frame.

Brass mess behind the horn,

I received three of these ribbon tweeters but they are not all the same. Two have cast alloy horns and the third had a plastic horn. And the alloy horns have a brass grill that sits in front of the ribbon (shown above), whereas the plastic one has a nylon mesh, which would better protect against incoming metal particles.

These have large, powerful magnets

The ribbon is mounted in a square frame made from two slices of stiff material. All three frames were different and used combinations of cardboard, Tuffnol and what looks to be copper-less circuit board material. Some have silver plated ribbon mounts and others are bare copper.

Old ribbon (left) and new one waiting to be soldered.

The ribbon material in these speakers is stiffer and thicker than one would use in a microphone. The thickest foil I had in stock is 6.5 micrometer thick, supplied by Advent Research Materials, so that is what is going into these. That is about three to four times thicker than would be used in a microphone. The gap is 10mm and I cut the ribbons at 8.6mm, based on measuring a 'good' ribbon. Corrugating is routine, but the challenge here is making the electrical connection from the ribbon to the mounts. There are no ribbon clamps but I can see traces of old solder. 


New ribbon in position.

Soldering thin aluminium needs a special solder and I used Alusol, which worked well after a little practice. All the contacts need to be cleaned before soldering. The solder needs quite a high temperature and you need to work quickly. To make this easier, I lightly glued the ends of the ribbon in place with nail varnish, which helped keep everything aligned. The top layer of the frame are then replaced - I used double sided tape to hold them together, and then the speaker can be re-assembled. 


New ribbon as seen through the horn.

I was only had the tweeters, not the cabs or woofers, and so could not test with full range music. Instead I ran a sign wave through the speakers. They sound clear and without distortion down to about 500 Hz which is a good indicator that I have done a good job. In use they should only be working above about 7 kHz. Now they will go back to the owner for proper testing.

Thanks to Andrew Mcgregor.

Update 18/11/22


Further reading. 

There is an excellent article about Decca ribbon tweeters by Rudolf Bruil at Sound Foundation.

2022/10/31

Reslo Beebs in Recording Magazine

Producer Marc Urselli has written a nice article about his love of ribbon microphones in the October 2022 edition of Recording Magazine. 

He discusses several vintage models in his collection, including RCA KU3, Coles, Melodium 42Bs and a nice mention of our upgraded Reslo Beeb ribbon microphones. Here are Marc's words about the Reslos.

"Speaking of Xaudia and vintage European ribbons, I also have two pairs of Reslo RBT/H 30-50 ohms Hi-Z miniature ribbon mics. Unlike the huge and super heavy Melodium, the Reslo is smaller than most dynamic mics. The Beatles (and many other bands from that era) used them as vocal mics live, giving them a bit of a cult following. Rather than on vocals, I have found that they work beautifully on string quartets—explains why I have 4 of them.

I had them equipped with the Xaudia Beeb Upgrade, which brings them back to 1961 BBC specs. The mod consists of swapping the transformer, converting the output from 50Ω to 300Ω, and reversing the motor assembly so the ribbon is closer to the front. This upgrade yields an extra 10dB of clean gain and reduces the noise of the mic, which is why these work great on strings!

Besides many lush and beautiful string quartets, I’ve also used them to re- cord the Dither Quartet—four electric guitar players who are very particular about their amp sound—and they loved these mics!"

2022/09/06

Syncron AU7a phantom power PCBs

Twelve years since first writing about the Syncron AU7a, I can finally offer a neat phantom power conversion. I converted a few of these in the past by hacking the original board or even building a tube circuit, but this is a better, tidier approach. A big thank you to Robert at Russell Technologies for designing boards and a better circuit from my sketches.


My Syncron AU7a converted for phantom power


The Syncron AU7a was one of the earliest transistorised condenser microphones, and was also sold as the Fairchild F-22. It ran on four mercury batteries, which had a tendency to leak after a few decades and are now obsolete. Conversion to run on phantom power seems sensible, but the original circuit used a P-channel JFET and positive ground, which are not compatible with modern phantom power supplies. A new circuit and a new PCB will make things a lot simpler. 


Syncron AU7a - circuit for P48 operation

We tried to stay close to the original philosophy, with a single transistor circuit which re-uses the Syncron transformer (above). The Syncron microphones that I have worked on did not use a source resistor bypass cap, but I had much better results with one in place. Dan Zellerman kindly supplied a version of the schematic which shows a 470 pF bypass cap, which was absent from my microphones. 

Working on these microphones is a bit of a pain because of the construction, and getting everything apart is the hardest part of this modification. The first job is to carefully remove the grill and capsule - put the capsule somewhere safe! The circuit is soldered inside a brass ring, and I needed to use a hot air gun and 80 watt iron to release that part. Some of the screws and mounting posts were also soldered in place. The transformer should be carefully removed, ready for re-use in the new circuit. 


New circuit board for Syncron AU7a


The board is then populated and soldered with the exception of R5, which needs to be adjusted to bias the JFET. Either a J201 or 2N3819 will work here. To find a suitable value for the source resistor, I connected a decade box and messed around until the junction with R1 was at 12 volts. (For this example, the value if R5 was 5K1 ohms.). Another way is to hook it up to a scope and inject a sine wave, checking for highest gain and lowest distortion of the waveform, or you can even do it by ear with a pair of headphones. You'll get a similar value either way. Larger capacitors go on the reverse side of the board, along with the transformer.


Transformer side of the circuit board.

Some of the clearance is tight and care should be taken to avoid shorting to the ring that surrounds the circuit. And at some point that ring needs to be soldered to ground to ensure good shielding. I used an 80 watt iron on the outside of the ring and fed the solder in from inside. Any flux residue and other crud should be cleaned from the board when all the soldering is done. A drop of glue between the ring and board would also be sensible - be sure to keep the glue away from the high impedance components.


New AU7a circuit in place awaiting clean-up.

The capsule can now carefully be put back in position and connected to the circuit, followed by reassembly of the rest of the microphone. This updated Syncron AU7a sounds very nice and with the new circuit it has a useable output level and the signal to noise is good. The output impedance is approximately 200 ohms with the transformer secondary windings wired in series or 50 ohms if wired in parallel.

Inside the AU7a with the new circuit board.


Below is a frequency sweep compared with a Sony C48 in cardioid mode. The updated Syncron has a similar output level to the Sony.

Syncron (green) and Sony C48 (blue) responses compared.


I can convert your microphone on request. Please get in touch.

2022/09/04

Sony Condenser Microphone Evolution - C37, C38, C48 and friends

Sony made a series of excellent large diaphragm condenser microphones, some of which have become studio classics. The earliest production model was the C37A, a tube microphone which may or may not have been used by Frank Sinatra - he has certainly been pictured with one - and it was definitely used to record the voices of Bugs Bunny and Daffy Duck. It has become sufficiently iconic for at least two clones to appear, made by Mojave and Tonelux.


On test - Sony C37p, C38b, C48 and C450

The C37P is the FET version of the C37, and is claimed to be one of the earliest production transistorised condenser microphones, although that honour is generally given to the Syncron AU7a. The C37p was followed by the C37Fet, and the C38 models. All of these microphones feature an unusual capsule design with an internal vent, which could be moved with a screwdriver from the rear of the microphone, changing the pattern from cardioid to omnidirectional. A very similar capsule is now made by Josephson Engineering, which is used in some of their own models and also rumoured to be supplied to other brands.


Sony C37 capsule - front

I am a big fan of the C38p and for the past 20 years have almost always used one for recording on my own guitar amplifier, often alongside a Shure 57 or whatever else is free after setting up for the rest of the band. The Achilles' heel of this design is that the mechanism can become difficult to turn, and many the C37s and C38s are stuck in the cardioid position. For many users that is not a problem.
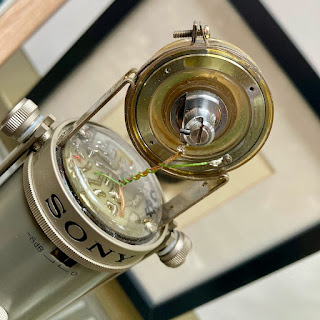

Sony C37 capsule - rear view


The later C48 and C800 models use a different dual sided capsule with centre terminals, which looks similar to those used widely by Neumann (and almost everyone else.) The C48 is a versatile microphone with three available patterns, bass cut and pad switches. 

Both the C38 and C48 models can run on 9V batteries and use a DC converter inside the microphone to generate the polarisation voltage for the capsule. These converters are tricky to repair when they fail.

Sam Inglis & I recently had an opportunity to compare a few Sony condenser microphones to see how they had evolved over time. On the day of testing we had access to a pair of C37p, one C38b, a C48 and a C450. In addition we looked at a Josephson C705 for comparison.

By comparing the microphones we hope to discover how these Sony LDC mics compare and are the new ones better than the old ones (or vice versa)? Does the capsule hold the key to the Sony sound, if there is indeed such a thing? And are the new capsules from Josephson good copies of the old Sony C37/C38 capsules?

As usual, the frequency sweeps are good for comparison purposes but are run in a small booth and should not be considered absolute measurements. The reference microphone is omnidirectional, which can cause a few inaccuracies when testing cardioid transducers. The dip around 12K is an artefact. Measurements were made at 30 cm distance from a concentric speaker. Measurements were made with a swept sine measurement and recorded using Fuzzmeasure Pro.


1. Comparison of C37p, C38b and C48


Comparison of C37p (lowest), C38(middle) and C48 (top)

As one would expect, the major change between models is the increasing output level (and signal to noise). The C37p is a very early transistorised microphone and transistor technology changed rapidly in those early years. It has a nice sounding bass proximity boost, and the mic is equipped with four EQ settings marked M, M1, V1 and V2 to compensate. (M is the unfiltered output).  The two C37s that we tested were very close, which is reassuring.

I own a C38b which I use it for my own recordings, and my perception is of a warm sounding microphone, without a harsh or hyped top end. I was surprised to see that it has a bit more of a top end lift than its predecessor.  It carries the M, M1, V1 and V2 settings through from the C37 and also adds a high cut switch. The M1 position acts as a high pass filter whereas the 'V' or vocal positions are more like a long shallow shelf. 


C38b filter - M (red),  M1 (blue) and V1 (green)

And the C48 is louder again. This is a more conventional multi-pattern microphone with electronic switching between cardioid, omni and figure-8. It also has bass cut and pad switches which are accessible via  a sprung panel on the rear of the microphone.

In my experience the C48 is a top quality recording tool and makes a good alternative to a U87 - I know a few engineers who prefer it to the Neumann. Barkley McKay at Valleywood Studios said "one of the reasons I like the 48 is it’s gentle roll off before 16k - it’s a little like an enhanced ribbon."


2. C48 vs C450

Sony C450 capsule, front. 

The C450 is a less well known model which looks a lot like the C48 but with some cheesy 1980s stickers applied. However, the C450 has a smaller capsule, around 24mm diameter, and runs on a single 1.5V battery.  We have not discussed or measured the C500 here because I don't have access to one, but I have a hunch that this is a similar size to the capsule in that model. Can anyone confirm that or share a picture of their C500?


Sony C450 capsule - rear

The C450 has an average output level around 11 dB lower than the C48, but is significantly brighter at the top end. It is equipped with high pass filter and -10dB pad switches, although you won't need the pad very often! The noise level is also a bit disappointing. It probably has a role on the right sound source but I haven't found it yet.


Frequency sweeps of C48 (top) and C450 (bottom)

3. Does the Josephson C705 sound like a better C37?

Josephson C705 in the testing booth at Xaudia

The Josephson C705 is an excellent microphone with a reassuringly solid feel, and does indeed sound much like a good C37p, albeit 12 dB louder and with an even better improvement in signal to noise. It is a transformerless circuit and is cardioid only (like a lot of C37 and C38 once the capsule becomes stuck!). It lacks the high pass filter options of the Sony microphones. The C705 it is not trying to be a clone or tribute in any kind of cosmetic sense. I admire Josephson because they do their own thing and try to make the best products they can. In this case they have done some clever things with the grill and acoustic environment around the capsule, moving the vertical support struts further back out of the way of the cardioid capsule. At around £2500 this is not a cheap option, but is a professional recording tool which will get you close to the Sony C37 sound.
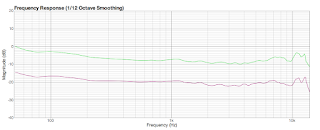

Sony C37p (purple) and Josephson C705 (green)


One final thought - Whilst doing some background reading for this post, I found that the older Sony mics were not highly regarded on internet forums back in the early 2000s, compared to Neumann and AKG. Here is a certain Mr K,.H.'s informed opinion.. 

"I never liked the C37A all that much, and would put it into the category "Post War Japan makes good" (as in their tiny late 1950s sports cars patterned after Fiats.) The C37A always struck me as a poor cousin of a ....?? Neumann mic: pretty poor craftsmanship, akin to what the Russians did in the 1970s; not much personality, pretty bad tube choice, cathode follower circuit with its associated gain and dynamic problems, etc... ...and then Sony went downhill from there with its FET mics... so I think."

I disagree. And the first thing I will do when I die and go to heaven or hell or Valhalla will be to march up to Frank Sinatra and ask him if he really did use a C37a! 

2022/08/29

Electrovoice PL10

The Electrovoice PL10 is a cardioid dynamic microphone which looks very much like a cut down version of the popular RE20.  It has no transformer or filter circuit but it still sounds excellent. These omissions presumably kept the price down.

Just like the RE20, the foam that holds the capsule in place can cause trouble. Over time this can degrade into a sticky pulp and then the capsule becomes loose and rattles around and may eventually destroy itself. This microphone needs new foam and a good clean right away!

The microphone body is in three parts - grill, body and base - which are screwed together and some kind of glue applied. I had to heat the threads and apply more force that I would like to break the glue and get the microphone apart. That was the hard part of the job, and once opened it is easy to remove the foam with a bit of isopropyl alcohol. As always, care must be taken around the diaphragm to avoid damage. The metal parts went into the ultrasonic bath and cleaned up nicely. 


Once back together, the PL10 is an excellent sounding dynamic microphone. The PL10 should be a cheap alternative to an RE20, but in fact they are scarce, and prices on eBay and Reverb may be higher than an RE20, which is a bit daft. 

Here are some comparison frequency sweeps of the two mics conducted at around 25cm from the source (as usual take with a pinch of salt.)


Frequency sweeps for RE20 (red) & PL10 (blue)

2022/08/27

AKG D99c manual


Here is the German language manual for the AKG D99c, also known as Harry.


An English translation courtesy of Google...

Our first artificial heads for experimental stereo listening were made in 1949

The Physics Institute of the University of Budapest conducted experimental tests. Many years of well-founded knowledge of the physical and physiological relationships of human hearing and the experience as a specialist company for electroacoustics have enabled us to make a noteworthy contribution to the artificial head stereo microphone, which has become current again, with the series production of a recording head within a short time. 

The interest of a large circle of committed tape fans and serious amateurs in an inexpensive one, which has recently been aroused by many press reports and extremely positively rated AKG demonstrations among trade visitors. We can now match the artificial head for stereo recordings with the AKG D99c stereo recording head, which is available now.

The material structure of the head and shape of the ear cups, in conjunction with a simplified but acoustically effective simulation of the ear canals in connection with the two special dynamic transducer systems integrated in the head, are tailored to an optimal recording [which is] analogous to human hearing.

When listening through high-quality headphones - regardless of whether closed or open earphones are used - the listener experiences an intensive acoustic sense of space that cannot be achieved when recording with two individual microphones. 

The artificial head as a physical structure itself is above all a prerequisite for the natural occurrence of the factors that determine the spatial impression, such as the difference in intensity, the difference in transit time and the frequency-dependent shadowing effect from one ear to the other. 

The AKG D99c stereo recording head, with its optimally designed frequency response (it must be viewed with different criteria than usual microphones), always ensures consistent objective recording properties and can be used as a "double", so to speak, where you need to keep your own head free for directing.

The stereo artificial head recording is particularly interesting where moving sound events are involved. For example, playing, singing children, lively design of radio plays or reports; also outdoors, for example with passing cars, noises in the background and much more. 

A further aspect: when recording conferences, it is easily possible for the listening recording clerk to concentrate on a specific speaker and to record his words due to the acoustic-spatial localisation. The spatially lively playback effect of the AKG stereo recording head D99c can be achieved with any AKG stereo headphones of your choice, regardless of whether the recording comes to the listener live via an amplifier or, as a tape recording, is listened to afterwards.

Technical specifications:

Frequency Range: 50-12500Hz

Sensitivity: 2.0mV/Pa = 0.20mV/ubar/channel

Impedance: 600 ohms per channel

Channel deviation: <3 dB for the entire transmission range

Optimum recording height by using an AKG floor stand.

2022/08/26

Harry the Head - modification to condenser mics

The AKG D99C is a binaural dummy head microphone, often known as 'Harry the Head' or just plain Harry. Like me, Harry was born in the 1970s and still looks good for his age, albeit with a slightly fuzzy finish (which presumably is to reduce reflections). Inside his head there are two rather basic dynamic microphone which point upwards towards the vents in his ears.Harry may look good but many of his kind sound disappointing and the sensitivity is low. My own D99C sounded particularly poor with a lack of low end response and a sort of crunchy mid range. 


Harry the Head, or AKG99C to his friends


And so here is an easy way to improve the sound and sensitivity - fitting two small omnidirectional condenser mics inside will make Harry much more useable. What is more, this modification is completely reversible. You can go back to the former crunchy lo-fi tones or retain the vintage value for a collector in the future. 


Audio Technica ES945. Remove the grills and mounting nuts


For the upgrade I used two Audio-Technica ES945* boundary condenser microphones, which can be found used for reasonable prices (I paid £33 each on ebay) and I made up two short and skinny XLR cables. You will also need some needle-nose pliers and a screwdriver.  Let's go!

Microphones, cable and aluminium strain relief 

Carefully peel off the base of the head, using a scalpel if needed to remove the glue. You can see two screws that secure the cable strain relief. Undo these. Remove the two circlips which hold the microphones in place. Then pull out the whole assembly of cables and two dynamic microphones.


End view of the AKG dynamic mics.


Undo the three small screws that hold the grill of the boundary mic in place and remove the grill. Also take of the big nut and rubber mounts if they are still attached. The mic is a little too narrow in diameter and I put a layer of heat string around it, but you could use some tape here. This stops the mic from rattling and moving around.

Then fit the cables and push the microphones into the holes in the head. You will notice that the mics are at 90 degrees to the ear-holes.


New mic with shrink sleeve and XLR cable attached.

The next thing to note is that the position of the microphones is critical to the sound. If you push them too deep past the ear vents then the microphone is essentially blocked and sounds tinny and horrible. But too gar below the vent it will sound hollow. I placed them by ear (sorry for the pun), listening as I moved the mics up and down, and settling for an optimum position. just below the ear vent.


Approximate position of the microphone inside Harry's head.

Once the mics are in position, thread the cables through the channels in the bottom of the head. You can replace the cable clamp if you wish, although that will require unsoldering the cables. (I used a hacksaw here to liberate the cables!). Then stick the base of the mic back on and the job is done. Now it is time to go out and record something.


Routing of the XLR wires under Harry


Personally I think that the AKG D99c, with it's cubist styling, is the best looking binaural head microphone, although the Neumann KU100 at £6800 GBP must surely be a better microphone!  

Whether binaural recordings sound better or worse than spaced pairs or every other kind of stereo recording is a discussion for another day. 

* I am sure that other models of boundary mics would work here just as well or better. I can imagine using a couple of Oktava MK012s with omni capsules, or even a pair of 451s if you want to stay with the AKG brand. Perhaps we should consider Harry to be a microphone holder, rather than just a microphone.

Here is the German language manual for Harry, along with a translation (by google, sorry).

You can read more about Harry at Vintage Microphone World.

Update 26 August - this post has been called 'Sacrilege' by Heinbach... "I call sacrilege. The grainy tone of Harry is part of its Charm." 


2022/08/21

Xaudia Active Dynamic Microphone (ADM)


The ADM is my take on the 'Speaker as microphone' concept. You may have come across this idea elsewhere, in certain vintage microphones, perhaps using a larger speaker as a sub-mic for kick drum, or in some boutique models, some of which are a bit low fi, but can be surprisingly good. 

A small speaker and a dynamic moving coil microphone operate on the same principles, with the differences being in the details such as mass of the coil and diaphragm. Ideally a speaker should be robust and handle some power, whereas a microphone element might be as light and sensitive as possible. Headphone speakers are generally small and light and can make decent microphones. One classic example is the Beyer M380 which uses the same element as (older) DT770 headphones.

The ADM uses a genuine new-old-stock Sennheiser headphone speaker which sounds very nice when reversed and used as a microphone. Like the Beyer M380, this has a figure-8 pickup which means that it also has a decent proximity effect and good side-rejection. The impedance of this speaker is a little higher than most microphones, and so I have fitted a phantom powered balanced buffer circuit to lower the impedance, reduce the noise floor and increase the common mode rejection, as well as increasing the output level. Overall it works very nicely.

I have a limited supply of parts and so this will inevitably be a limited run. 

Further details and sound clips to follow soon. Available from September 2022 at £199 plus postage.

2022/08/05

Calrec 6-series Microphone Upgrades


These Calrec small diaphragm condenser microphones have been kicking around in the workshop for several years. They sound nice but the noise floor was always too high to be of much use, and they also need a specific power supply rather than standard 48V phantom. And they are difficult to service because the high impedance section of the circuit board is potted in what looks like epoxy resin - including an electrolytic capacitor. If anything goes bad in there then it is near impossible to replace.


Consequently these never got used and nobody wanted to buy them.

I decided to hack them and my approach to these was to do a full rebuild using a new circuit board from Russell Technologies. The new circuit is based on designs by Okatava and Schoeps, and is a simple two stage transformerless design. It works well with the Calrec capsules and sounds nice and full without being overly bright.


A couple of things to note. The connection to the capsule is made by a copper spring, This needs to be removed from the old circuit board, cleaned and soldered onto the new board. The rear of the capsule should also be cleaned to remove any oxidation.

Top - New circuit board with spring and locking ring..

Secondly, there is an internal locking ring which holds the circuit in place. This is expanded using a grub screw. This ring needs to be re-used here to ensure a little compression of the spring and good contact with the capsule back plate.

Xaudia can offer this as a repair upgrade service. Please get in touch if you need further information.