
 |
| Decca London ribbon tweeters with huge transformers. |
I have not repaired speakers in the past, but I recently had my arm twisted to look at some vintage Decca London ribbon tweeters. In theory they work in a similar manner to a ribbon microphone and should not present too much of a challenge.... right???? Anyway, it is nice to see something different on the bench and maybe I will learn something in the process.
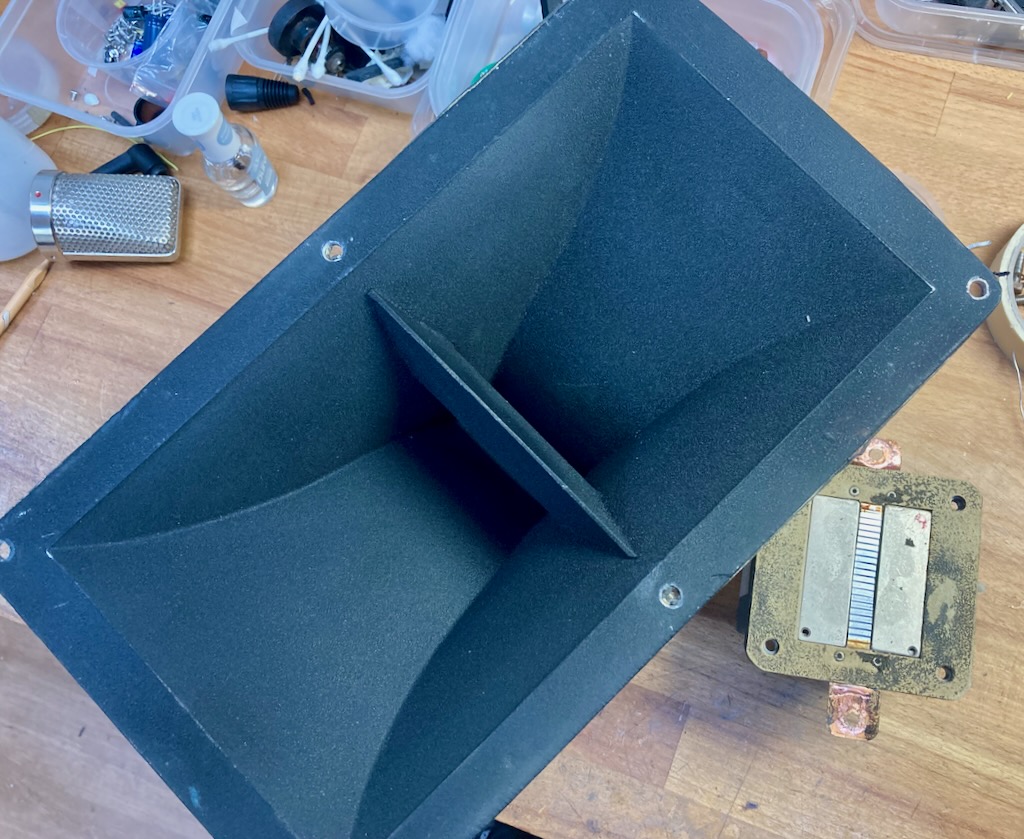 |
| The horn of a Decca ribbon tweeter |
The first challenge was to take the speakers apart and work out what is going on inside. They have a large horn with two vents, which is is held in place with six screws. With these out of the way it is possible to remove the large, powerful magnet assembly and ribbon frame.
 |
| Brass mess behind the horn, |
I received three of these ribbon tweeters but they are not all the same. Two have cast alloy horns and the third had a plastic horn. And the alloy horns have a brass grill that sits in front of the ribbon (shown above), whereas the plastic one has a nylon mesh, which would better protect against incoming metal particles.
 |
| These have large, powerful magnets |
The ribbon is mounted in a square frame made from two slices of stiff material. All three frames were different and used combinations of cardboard, Tuffnol and what looks to be copper-less circuit board material. Some have silver plated ribbon mounts and others are bare copper.
 |
| Old ribbon (left) and new one waiting to be soldered. |
The ribbon material in these speakers is stiffer and thicker than one would use in a microphone. The thickest foil I had in stock is 6.5 micrometer thick, supplied by Advent Research Materials, so that is what is going into these. That is about three to four times thicker than would be used in a microphone. The gap is 10mm and I cut the ribbons at 8.6mm, based on measuring a 'good' ribbon. Corrugating is routine, but the challenge here is making the electrical connection from the ribbon to the mounts. There are no ribbon clamps but I can see traces of old solder.
 |
| New ribbon in position. |
Soldering thin aluminium needs a special solder and I used Alusol, which worked well after a little practice. All the contacts need to be cleaned before soldering. The solder needs quite a high temperature and you need to work quickly. To make this easier, I lightly glued the ends of the ribbon in place with nail varnish, which helped keep everything aligned. The top layer of the frame are then replaced - I used double sided tape to hold them together, and then the speaker can be re-assembled.
 |
| New ribbon as seen through the horn. |
I was only had the tweeters, not the cabs or woofers, and so could not test with full range music. Instead I ran a sign wave through the speakers. They sound clear and without distortion down to about 500 Hz which is a good indicator that I have done a good job. In use they should only be working above about 7 kHz. Now they will go back to the owner for proper testing.
Thanks to Andrew Mcgregor.
Update 18/11/22
There is an excellent article about Decca ribbon tweeters by Rudolf Bruil at Sound Foundation.

No comments:
Post a Comment
Post a comment!
Note: only a member of this blog may post a comment.