Hello!

Xaudia offer microphone re-ribboning and repair services.

2013/04/30

MOTM - Toshiba Type K multi-pattern ribbon mic

Last month I posted about a Toshiba copy of the RCA BK5. Here we have Toshiba's take on the RCA77 DX....

Toshiba Model K

The Toshiba model K was one of the later Japanese ribbon mics. By this point they had really mastered the technology and were producing high quality microphones to rival to the American mics. It is slightly shorter than an RCA 77DX, but is equally heavy and well built. I very much like its stubby looks and slotted grill holes.

Rear of the model K, with pattern control

The model K was designed to broadcast standards, and this specimen was obviously made for NHK (Nippon Hōsō Kyōkai, or Japan Broadcasting Corporation), which is Japan's equivalent of the BBC. Like most Japanese ribbon mics, this has a 600 ohm impedance and gives a strong output.


Inside the mic, the motor is based around a single strong horseshoe magnet, with the ribbon held between two chunky pole pieces.


Like the RCA 77DX, there is an acoustic labyrinth made from a series of holes with connecting channels, which goes up and down the centre of the mic. Two thick wires take the signal from the ribbon, through the labyrinth, down to the transformer below.

Acoustic labyrinth in the middle of the mic

The pattern control uses a choice of baffles to partly or entirely redirect the rear of the ribbon into the acoustic labyrinth. This turns the mic into a pressure transducer when the rear baffle is closed, giving a more omnidirection pattern.

Pattern control on the Toshiba type G.

It differs from the RCA design: the 77DX has a a cam shaped copper plate that allows the rear vent to be opened by incremental amounts, whereas the Toshiba has three discrete positions, which are labelled...
  • N (fully closed - non-directional)
  • B (fully open - bidirectional or figure 8), and 
  • U (a small opening - unidirectional or cardioid)
And in an attempt to beat the Americans, on the bottom of the mic there is a switch for a 6 position variable frequency high pass filter - the RCA77DX only has three!

High pass filter switch

Update 27/5/13... this is how the filter affects the frequency response....


2013/04/22

The Bang and Olufsen ribbon microphone family

Bang and Olufsen are a Danish company that make high end hi-fi equipment. Once upon a time they made some decent ribbon mics too. Here are a few...

B&O ribbon mics, from left, 2x BM2, 2x BM3, 2x BM6, 3x BM5 stereo

As far as I can tell, the first commercially available B&O ribbon mic was the BM2 - which begs the question "what happened to the BM1?" There seems to a bit of confusion about this, and possibly there never was a model called BM1. According to Beophile, the first B&O microphone was a dynamic mic called MD1. However, others have listed this as BM1. Numbers 2 to 7 were ribbons and carried the prefix BM, which may have stood for 'baand mikrofon' - Danish for ribbon microphone. Although it could also have stood for beomic. The MD8 was also a dynamic.

B&O BM2 ribbon microphone

Regardless of the BM1 (or lack thereof), the BM2 is a good-looking microphone, with a very different look to the later mics. It has a cast metal body and folded, chromed brass grill. The mics were painted in a green-yellow textured paint, which looks better than that sounds! They are usually* 50Ω mics, with an a switch which connects an inductor into the circuit, for a high pass filter. The ribbon is held in a removable frame, which slides out for servicing. (*They can be re-wound for 300Ω, to great effect).


The BM3 and BM4 look very similar to one another, and used an evolution of the motor assembly in the BM2, this time in conjunction with a steel tube body. This design set the style for all their later ribbon mics, and also inspired Speiden and Royer microphones, and a bunch of clones such as this Stellar mic.

B&O BM3 microphones

In the case of the BM3, the ribbon motor frame is larger than the diameter of the tube and sticks out from the sides of the mic, giving it the look of a long face with ears, or perhaps Doctor Who's Cybermen. It has a three way selector switch which provides M (music - full range), T (talk - HPF) and  0 (off) positions.

Motor frame from the BM3, with Xaudia transformer, awaiting a new ribbon

The BM4 looks the same as the the BM3, but with an additional switch at the rear for selecting 50, 250Ω, or high impedance output. The BM3s were fixed at 50Ω (and benefit from a matching transformer or upgrade). Occasionally you see these badged as "Fentone", although, oddly enough, they kept the B&O name on the mic too.

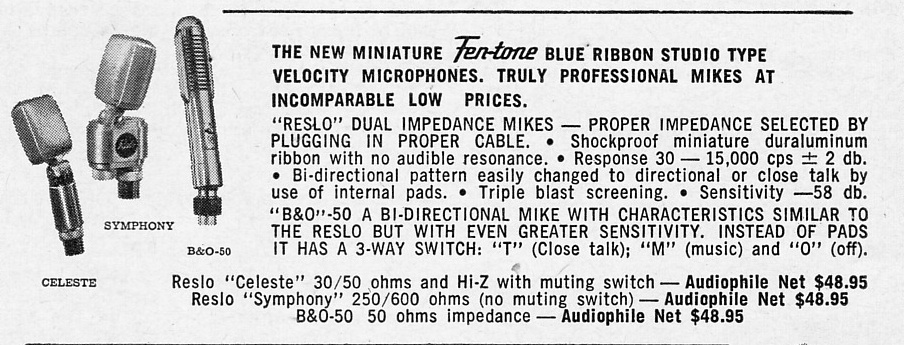
Fen-tone add showing the BM3 - from Preservation Sound

The BM5, BM6 and BM7 came later and formed a family of mics. The BM5 is the stereo model, and when rotated to 90 degrees, it is perfect for Blumlein pair recordings. The bottom half of the BM5 was available separately as the mono BM6, and the top was called the BM7, although it could not be used by itself.

Standard BM5 stereo set with stand

The design was an evolution of the BM4, but by this point the ribbon frame and been replaced by plastic mounts, and the cyber-ears have gone. The magnets are also slimmed down, with a semicircular or triangular cut-out, presumably in an attempt to increase the high frequency response. In these mics the body of the mic is made from steel and also acts as the magnetic return path, which helps to increase the output.

Insides of a B&O BM6 ribbon mic. Note the pistonic ribbon

Like all of Bang and Olufsen ribbon mics, the BM5/6/7 family have a pistonic ribbon, which is gently curved in the middle and deeply corrugated at each end. The ribbons were made from Duralum alloy, which contains copper in addition to aluminium, to improve the strength and stiffness. However, the alloy is more prone to corrosion than pure aluminium, and it is quite rare to find ribbons that are in perfect condition.

Delux BM5 set in posh wooden box!

From a technician's perspective, these later mics are less robust  than the BM3/4. To me they feel more of a hi-fi design than one for a busy working studio. Although the sound is excellent, they are delicate in places and some of the plastic parts deteriorate with age, most noticeably the rotating ring in the top part of the mic. The switch tips also have a tendency to come off.

Plug for a B&O BM3 microphone

All the B&O mics used bespoke connectors, which can be hard to find. the BM2, 3 and 4 have a 3 pin connector only found on B&O equipment, whereas the BM5 and 6 used 5-pin DIN connectors but with their own threaded locking ring. The latter can be replaced with a standard bayonet DIN if the cable is missing.

Here are some links to wiring diagrams for some of the mics.
BM3 data sheet
BM4 data sheet
BM6 data sheet
BM7 data sheet

Thanks to Tom Day and Robin Kiszka-Kanowitz for additional information.

Update 1/2/18

Our friends at Extinct Audio now manufacture the BM9 studio ribbon microphone, which shows the  influenced of the B&O designs.


Update 4/3/14

We now have upgrade magnets and transformers for all B&O microphones.

Update 22/4/13

Many thanks to Evan Lorden for sharing these photos of his B&O MD1.


2013/04/19

Geloso M88 dynamic microphone

Here is a pair of funny little Geloso dynamic microphones, one is in pieces already.

Geloso M88 dynamic mics

The build quality is nice - better than the early Geloso mics which tend to crumble. It has an internal two-bobbin humbucking transformer, to give an output impedance of 250 ohms.

Internal transformer for impedance matching duties

The diaphragm is made from a light plastic for fast response, and they sound nice, if a little light on  bass.

Geloso M88 diaphragm in good shape

They use an annoyingly unobtainable 4 pin connector - I feel an XLR mod coming on...

The original unobtanium connector can be converted to XLR

:)

2013/04/14

Short, stubby and dynamic - The Reslo PGD

Reslos are best known for their ribbon mics, but they made some dynamics too. 

Short, stubby and dynamic - The Reslo PGD

This early model is labeled 'Dynamic - PGD', which one assumes stands for Pressure Gradient Dynamic. It proudly says 'Reslo', on the badge -  the later RB mics were mostly labeled 'Reslosound Ltd'.


The PGD appears to be made of leftover parts from the RV ribbon mics. The base of the mic is the same, complete with swivel mechanism, and the grill looks like a cut down version of the RB too. As usual it uses the annoying Reslo plug.

The head on the RGB could be tilted for best pickup of sound.

There is space in the base of the mic for an output transformer, although this 30 ohm example doesn't need one. I don't yet know if they were produced with other output impedances, but it would not be surprising, as later models like this pencil mic came with switchable outputs.

Reslo PGD - aluminium diaphragm

Like many early dynamics, it has a pressed aluminium diaphragm, which is heavy and stiff compared to later polymer film designs. Consequently has a quite lumpy response. Here is a frequency plot for one mic - other examples may differ!

Frequency sweep for Reslo PGD mic.
Thanks to Sean Davenport.

2013/04/01

Experiments with Carbon Microphones

Carbon microphones were one of the earliest audio transducers, and were used for radio broadcasts up until the mid 1930s, when they were superseded by ribbon microphones. 

They were really simple devices, with small particles of carbon packed into a space between two electrodes and pressed against a plastic, mica, rubber, or wax paper diaphragm. When connected to a battery supply, a current flows through the mic which is modulated as the sound impinging on the diaphragm compresses and releases the carbon particles. 

Old carbon microphone - unknown manufacturer

I have been meaning to investigate carbon mics for some time, so when a couple came up for sale for £10 each, it seemed like the perfect opportunity to get my hands dirty. Literally. In German these are called Kohlemikrofon, which also translates as 'coal microphone'. :-)

Carbon microphone with the diaphragm and carbon removed.

The body of the mic is made of an insulating material, in this case a block of marble. The classic Marconi-Reisz microphone also used marble - this one is clearly a copy of that mic. Others had bodies made of wood, which must have been cheaper to make. Four hooks screwed into the body would have been used to suspend the mic within a metal ring, using springs or rubber rings, like this nice example at the ORBEM website.

Old diaphragm and grill from a carbon mic

After many decades this example is in pretty poor shape: most of the carbon has escaped into the wild, and the diaphragm is cracked and perforated. I wanted to try and get this working again, for fun and as a learning experience.

Clean again!

 The first step was to clean everything up in the ultrasonic bath, and the brass terminals were given a scrub. At least it looks better! The carbon will sit in the depression between the two brass terminals.

New diaphragm !

I made a new diaphragm by stretching a sheet of thick cellophane over the bakelite frame that makes up the front of the mic, and then heated it gently with a hot air gun. The plastic film shrinks and pulls itself tight. It looks neat and has a similar thickness to the original - as far as I can tell.


It took me a little while to work out the purpose of this big screw in the base of the mic. It is in fact for filling the microphone.


Then the mic can be re-assembled and filled with new carbon granules. It takes a few goes to pack the carbon, shaking the mic in between each fill.

Carbon microphone circuit, from the TFPro website.

I tried a circuit inspired by the one above, using a battery and transformer.  Ideally the transformer should be gapped, or a capacitor used to block the DC, to prevent saturation.


With a new diaphragm and new carbon, the microphone does now pick up sound, and although it is far to noisy for any serious recording, I was pleased just to get that far in my first attempt. As always with microphones, the art is in the detail and I can now at least appreciate some of the design parameters than need to be considered. These include
  1. Diaphragm material, tension, thickness and stiffness. The diaphragm needs to be thin and compliant enough to vibrate, yet stiff enough to transfer the energy to the carbon granules. Cellophane may perhaps be too flexible, but glass or hard plastic could be too stiff.
  2. Carbon granule type, size and packing. The carbon needs to be compress reversibly by the diaphragm, otherwise it will pack and stop working.
  3. Impedance. I noticed that the impedance of the mic dropped from about 10K ohms to 1K ohms on tightening the filling screw. Clearly some pressure on the granules makes a big difference to the impedance, and also made an audible difference to the sound of the mic.
  4. Terminal size and shape. The contact with the carbon granules will affect the impedance of the mic and the efficiency.
  5. Circuit. Varying the voltage across the mic made a noticeable difference to the noise level. The transformer should be capable of taking some DC current, or a capacitor used to block the DC. (which is how I did it)
There is also a nice blog post about carbon mics at Preservation Sound.