You can easily imagine the product development meeting at AKG back in nineteensixtysomething...
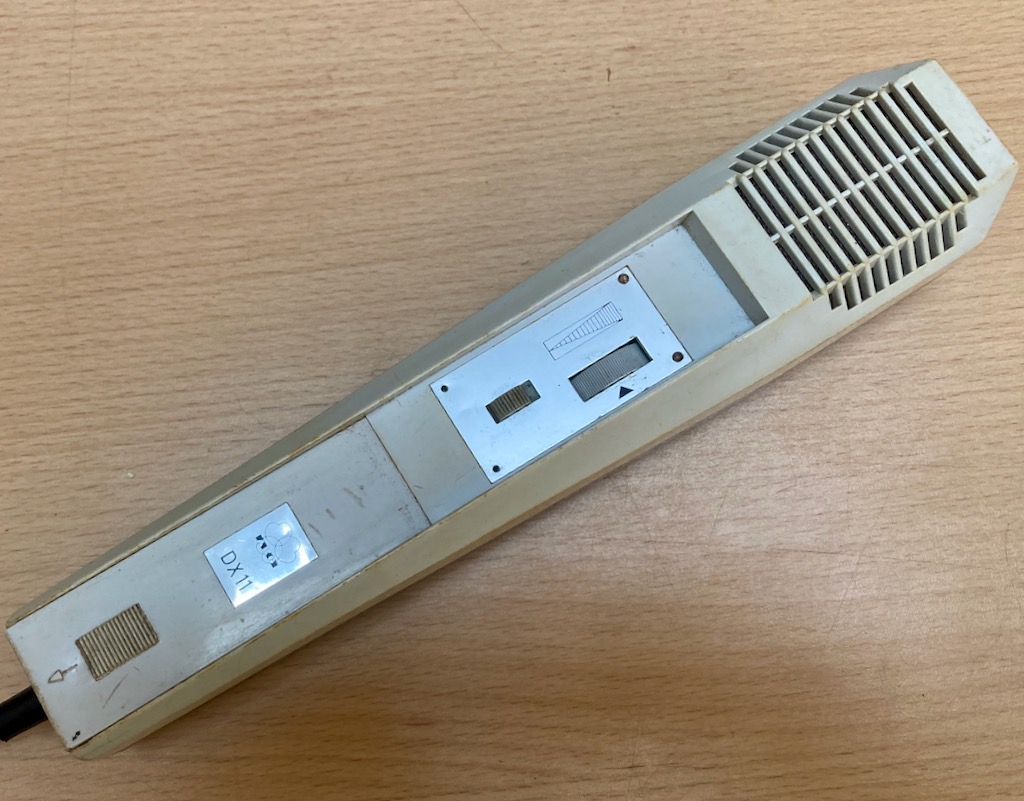
Or something like that. It is certainly true that AKG made some great microphones (too many to list) and a lot of nasty ones (also too many to list). The AKG BX10 and BX20 spring reverbs have become studio classics. And so if any company was well positioned to make a microphone with a built in reverb, it had to be AKG. The result is the AGK BX11, which is a battery powered dynamic microphone with a built in single spring reverb and a battery powered circuit which uses five germanium transistors to amplify the signal and drive the reverb spring.
AKG DX11 echo microphone
There are some major shortcomings to this design. It is impossible to use this as a hand held microphone because the spring just rattles around. The microphone capsule is not great quality, battery life is short and the germanium transistor circuit is noisy. And although the microphone element is certainly not of hi-fi quality, and the spring is 'boingy' rather than lush, none of that matters because it is quirky and fun and offers something unique.
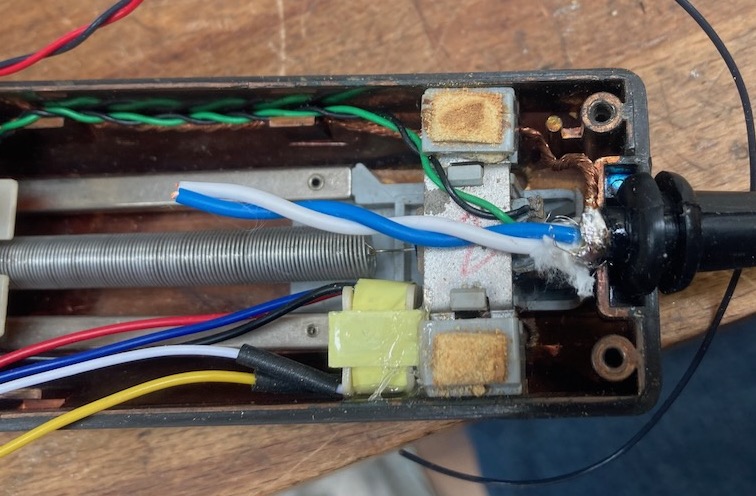
AKG DX11 capsule and circuit board
The owner of this one had enquired about converting the mic to run on phantom power, but that was not trivial because the circuit has a positive ground, and I also had doubts over whether we could supply sufficient current with phantom. The output of the microphone of the DX11 is unbalanced 15K ohms or unbalanced 200 ohms.
AKG DX11 spring reverb
I added a small Neutrik 10:1 transformer to drop the unbalanced 15K output down to a balanced 150 ohms*, which makes it a bit more compatible with mic preamps and mixers, and wired to a normal balanced XLR output. The transformer fitted in neatly in the cavity behind the capsule. (*You could use a 1;1 transformer from the 200 ohm output).
DX11 circuit hacks - Click on the image to see a bigger version.
After a bit of initial testing, I came to the conclusion that reverb is better than the microphone, and so, after a discussion with the owner, we decided to fit a line input to the reverb circuit. The microphone capsule itself has a measured output of 250 ohms, so it was easy to hack into the circuit at that point, via a switched mini-jack socket. Now one can run other things into the reverb, such as a better dynamic or ribbon mic, a quiet line input or a guitar via a DI box.
Here is a picture of Adam from Extinct Audio test-driving the DX11 reverb (on the bench) with a Jazzmaster guitar...
TEST: EXTINCT AUDIO BM9 VIKING UND BLACK OPS, BÄNDCHENMIKROFONE
There are Englishmen that every child knows. Harry, Charles and William are currently the talk of the town, Ringo, Paul, George and John have written music history. Away from the limelight, there are four Brits, Stewart, Adam, Paul and Ant, who handcraft fine ribbon microphones in their small microphone forge Extinct Audio. Our author Raphael Tschernuth took a closer look at these fine British mics.
Ribbon mics have enjoyed unbroken popularity over the past two decades. While they were almost extinct until the early 1990s, they have been celebrating a resurgence at least since the Royer 121 and digital recording. The name Extinct Audio is an allusion to the fact that this type of microphone had almost disappeared from the face of the earth and was considered extinct. An old "Snake Stone" fossil, a local legend, serves as the company logo for the young English company.
Extinct Audio was founded by none other than Stewart Tavener of Xaudia.com, one of the reference addresses when it comes to ribbon microphone repair. In 2007 Stewart started to offer his service for ribbon microphones and since then the order book is bursting at the seams.
Some of you might be familiar with the microphone blog of Xaudia Elektrik, where you can find a lot of information about long gone microphone models of all kinds (links in the box below).
Since the founding of Xaudia, Stewart has had well over 10,000 ribbon microphones on his desk for repair. He knows them all - from great RCA classics to fancy designs from Italy or Denmark to modern China replicas. His experience over the last few years has finally led him to not only repair microphones, but to develop independent designs and bring ribbon microphones to the market himself.
Together with his friends Adam and Ant, he started Extinct Audio, with the goal of offering handmade ribbon microphones at a reasonable price. Stewart and Adam are musicians themselves and know how tough life can be with this profession. But not only did they want the mics to be affordable, they also wanted them to be responsibly made from local resources and meet the highest quality standards.
In fact, the company that builds the bodies is located just a few miles from the Extinct Audio workshop. The transformers required for a ribbon microphone are of their own manufacture. The wooden boxes of the microphones are made by a company that otherwise mainly produces wooden boxes for high-quality whiskey bottles. And yet the English somehow manage to keep the price in the €900 range, while other mics, such as the 121 from Royer or the Coles 4038, have seen huge price increases, especially in recent years.
The underlying design of the two Extinct Audio microphones under review is based on the Bang & Olufsen BM3 which was developed in Denmark in the late 50s. This microphone was at the time one of the smallest ribbon microphones, its form factor was only made possible by the development of an ever stronger magnetic materials.
Perhaps some of you are familiar with the really thick ribbon microphones from the 1930s, such as the Siemens M25 or the BBC Marconi, each weighing in at over 4 kilos. The high weight and the high mass were necessary at that time, because there were no magnetic alloys with which strong magnetic fields could be realized in a space-saving way, as today with modern neodymium variants.
The BM3 from Bang & Olufsen was a revolution in the 1950s and was and was an inspiration for the Royer R121 in the 90s. The newly available neodymium magnet materials helped the Royer 121 achieve tremendous output. The Extinct Audio BM9 is also based on the concept of the BM3, even keeping the BM naming for "ribbon microphone.”
The BM9, nicknamed "Viking," is a general-purpose ribbon microphone with a pure figure-of-eight characteristic. In terms of sound, it is clearly in the tradition of legendary ribbons such as the RCA 44 BX, Melodium 42b, etc. Its full-bodied bass range paired with brilliant highs gives voices and instruments an inimitable "Bigger Than Life Sound". The proximity effect is, as typical for this type of microphone, very pronounced and therefore a little distance to the sound source is recommended.
No less than the great John Williams used various BM9s for the recording of his soundtrack to Star Wars for the orchestral recordings. And this for a production that can afford any microphone imaginable. This could almost be called an accolade for Extinct Audio (not to be overlooked from about 30 seconds on):
The Black Ops, on the other hand, is recommended for all applications where the microphone is to be positioned close to the sound source. It is particularly well protected against wind and air currents, and its specially adapted transformer ensures a well-balanced sound even at a very close distance from the sound source.
This allows the Black Ops to be positioned directly next to a guitar amp or snare drum, for example, without having to equalize the bass range by using an EQ. Like the BM9, the treble imaging is incredibly detailed and smooth for a ribbon microphone. The Black Ops was designed for harsh live use; among others, the English band Foals relied on various Black Ops for their recent live tours.
The "classic" BM9 Viking uses a 1.8 µ thick ribbon, the Black Ops uses a slightly thicker 2.5 µ. For comparison: the thread of a Spider’s web is about 6µ thick, a human hair even 50µ. Therefore, one should be as careful as possible with this type of microphone.
The frequency range of both mics is between 30 Hz - 15 kHz and sonically the foreground and rear are absolutely identical. While the BM9 has an impedance of 300 ohms, the Black Ops has an impedance of 250 ohms - in practice this is irrelevant, as both mics with these values will harmonize perfectly with current preamps. The sensitivity of the BM9 is 2.23 mV/Pa, a high value that does not demand too much from the microphone preamp. Thus, the BM9 delivers a higher signal than many a moving coil candidate. Nevertheless, it should be mentioned at this point that ribbon mics often benefit sonically from stand-alone, external preamps. For entry-level or mid-range audio interfaces, an inline amplifier is a good choice, and the market is now teeming with them. Alternatively, one can also fall back on an active variant.
While testing the two mics described above, the manufacturer posted on Instagram that development of the active variant was complete. Without further ado, I made an effort to get hold of one of the first series models for the test and I was sent the first available stereo set. The active circuit increases the output signal by about 22 dB of noise-free gain. This significantly relieves the preamp and the recorded signal is comparable to that of condenser microphones. We will also consider this model in the practical test.
Extinct Audio offers manufacturing character par excellence with its microphones. When unpacking the microphones, the testers can't help but be amazed at how much love and attention to detail has gone into the work.
The wooden cases are, as already mentioned, not cheap barware from the Far East, but extremely solid and excellently crafted. They offer perfect protection for one or two microphones. A serial number is emblazoned on a metal plaque on the outside, and inside the casket a signed certificate provides information about the day on which the microphone was manufactured and which employee took care of which production steps. The microphones themselves are beyond reproach in terms of workmanship.
This is pure perfection, without compromise. Metal workmanship and are excellent, logo and metal gauze perfectly attached, all edges rounded, the serial number engraved on the back - that's how it should be. With their 355 grams, the Black Ops and BM9 feel good in the hand and radiate their very high value. Due to their light weight, they can be securely positioned even with simple microphone stands and are easy to set up. A screw-in mount was also included with the review sample, but ordinary medium-sized microphone clamps can also be used.
If there is one application that one immediately associates with the Royer 121, it is the miking of a guitar amp. This ribbon mic has earned legendary status since its introduction in the late nineties. Compared to many classic ribbon mics, it delivers a somewhat thinned-out bass image and can be positioned relatively close to the amp. With an old, venerable Coles 4038, for example, the immense proximity effect would absolutely require the use of a high-pass filter. So with ribbon mics, it's always a matter of finding the sweet spot and using it profitably in your work.
In the following audio sample, you can first hear the mentioned Coles 4038 at a distance of only 13 centimeters. The recording is much too bass-heavy due to the proximity effect. After applying a high pass filter (100 Hz, 24 dB/oct) the tide turns and the sound suddenly becomes usable, possessing a "creaminess" typical of ribbons:
In comparison, you can hear the sound of the Shure SM57 dynamic moving coil microphone, which is considered the "industry standard" for amp recording. This is much more "grainy" and garish to work.
In terms of sound, the Extinct Audio BM9 Viking ribbon microphone is on the "classic" side of power. Similar to the Coles 4038, it therefore requires the use of a high-pass filter to deliver a balanced signal at a distance of only 13 centimeters:
The Extinct Audio Black Ops, on the other hand, does not require an additional filter, since the bass increase was compensated for by the transformer used. As a reference, you will also hear the Royer 121 afterwards, unprocessed at a distance of 13 centimeters from the speaker. Again, an HP filter would suit the signal well. With Black Ops, on the other hand, the signal is immediately "mix-ready".
The different proximity has a direct impact on the use. Positioning all microphones at the same distance in front of a sound source would therefore be extremely bad for a meaningful test report, since every microphone deals differently with the bass boost and has its own sweet spot. The BM9 is full-bodied, with the Royer 121 the proximity effect is somewhat reduced and with the Black Ops it is somewhat less than with the Royer. On the acoustic guitar I therefore decide on three different distances
Extinct Audio Black Ops: Distance 30 centimetres
Royer 121: distance 40 centimetres
Extinct Audio BM9 Viking: distance 50 centimeters
Many thanks at this point to the really impressive singer/songwriter Fabian Holland, who recorded the acoustic guitar for this test.
The test shows that the Extinct microphones can easily compete with the Royer 121 in terms of sound quality. This is impressive when you consider the price difference of almost 1000 €. Ribbon microphones are also excellent for imaging percussive instruments. One reason for this lies in the natural mapping of the transients, which are mapped very quickly and vividly.
In the following example you hear the drummer Achim Färber. The BM9 stands a few meters away from the drums. It is a mono recording without any effects. The Black Ops was positioned on the snare, also without any change in signal:
During the test period, the Black Ops has become one of my favorite microphones for the snare drum. The figure-8 characteristic makes it excellent for masking out adjacent toms or hi-hats. The strong attenuation on the 90- or 180-degree axis can be used excellently.
Last but not least, here's a short sample I recorded myself with two BM9s as overheads and a subkick. As before: no EQ, no compressor... nüschte, as the Berliner says.
During the test period, I had the chance to use the Extinct Audio Mics on many other sound sources. They delivered excellent results on cello, as a stereo Blumlein set on piano, or on vocals with soft S sounds. The stereo pair was also perfectly matched before delivery, and the two measurement curves were absolutely identical.
By the way, the active version sounds exactly like a passive BM9, only louder. Sure, you could also loop in an inline preamp like the Fethead, but that makes the construction a bit unwieldy on the one hand, and on the other hand the shielding falls by the wayside. Unfortunately, inline preamps are prone to turning cell phone radiation into audible tones. When the network builds up, beeping and whistling can therefore be picked up unintentionally. The active version is well shielded in this respect and does not transfer any noise to the audio signal. And by the way, it looks much better...
Final Thoughts
Chapeau! The small microphone workshop Extinct Audio, delivers with the BM9 Viking and the Black Ops two ribbon microphones that leave nothing to be desired. The workmanship was done by hand with great attention to detail, the materials used are high quality, locally "sourced" and guarantee a long life. Each microphone is individually measured before delivery and stereo pairs as well as active +48 variants are also available. The latter brings the already high output to the level of a condenser microphone. Sonically, the BM9 is in the tradition of legendary ribbon microphones, while the Black Ops is predestined for close miking. Both reproduce percussive instruments with tangy transients, deliver vocals with smooth S-sounds, and are predestined for a wide range of applications and sound sources. In addition, they possess a remarkable top end for microphones of this type. Combined with a very good price/performance ratio, this leaves an unclouded picture that clearly stands out from many Asian competitors due to the high quality.
+
Excellent workmanship
Very good stereo matching, measured values
High output
Very versatile
Great, classic ribbon sound (BM9)
Balanced sound when positioned close to the sound source (Black Ops)
Durable design, handcrafted, made from local resources
This review was written by Raphael Tschernuth of Gear and Sound for the German language site Amazona.
OK, this might be a little bit controversial: the M500 is my least favourite ribbon microphone from Beyerdynamic. This is for a number of reasons. I'll list them.
The transformer rolls off a lot of bass. More so than an M260.80.
The grill has a dense cloth screen which also reduces the bass response.
The internal baffle has a plastic plate in front of the ribbon which robs yet more bass and causes other problems, as I will explain in a moment.
Beyer M500 and a Kazoo. Can you tell the difference?
These three points are all intentional parts of the design. The M500 was intended as a vocal microphone and designed to be used at point blank range. The severe bass cut compensates for the proximity of the ribbon, and the extra screening and baffle protect the ribbon from plosives and other blasts of air. So to some extent you have to take your hat off to Beyer and say 'chapeau' for making a ribbon that can compete with an SM58.
But that's my point really. Ribbon mics naturally have a big rich proximity effect, which is one of the things that we love about them. In the M500 a lot of work has gone into removing that sound. To my mind, the M500 is good for one job only (close up vocals), and there are other microphones that do that job better. If you like to chew your microphone then you might as well use an SM58 (or better still a Beta 58), and use a ribbon for those places where it excels.
These microphones are no longer made but change hands on eBay and Reverb at inflated prices. I think the biggest issue with them is expectations. Some buyers expect them to sound close to, say, an M260, and are disappointed when they don't. In particular they sound very thin when used on instruments at a normal recording distance. At Xaudia we often get asked to modify these mics to have more bass and have more of a classic ribbon sound.
The motor and ribbon are more or less the same between the two mics, but everything else is different. It is possible to get a better bass response from the M500 by swapping out the transformer for a full range model*, which helps a lot. But the mic can still sound odd because of what is in front of the ribbon.
So let's get back to that baffle that I mentioned in item number 3. Here at Xaudia we call this the 'Kazoo Flap'. Let's take a look at it.
The M500 "Kazoo Flap". This bit of perspex causes trouble.
You can see that there is a flat piece of clear plastic in front of the ribbon. The problem here is that is can vibrate and come loose over time. I often see these come unstuck at one end and it can vibrate like the reed on a clarinet or saxaophone. It sounds like a kazoo solo has been added to every recording!
Luckily it easy to fix. The baffle can be re-glued or removed completely. I often do the latter and replace it with some fresh acoustic fabric and steel mesh.
M500 baffle modifications.
Swapping the transformers and the baffle gets the M500 as close to an M260 as it can be. The grill construction and the acoustic chamber behind the ribbon are different between the two microphones so they can never be quite the same, but the changes improve the bass response by huge amount and, to my ears, make it sound like a proper ribbon microphone.
Beyer M500 - designed for close up use on vocals.
* We make a suitable full range transformer that will fit inside an M500.
Xaudia has been running for about 15 years and we get a lot of repair work which now seems routine. We see hundreds of Reslos, B&O mics and Beyers in particular. When I started out, everything was new but it is now a rare occurrence to see a ribbon microphone that I have not worked on before. Sometimes I think I have seen it all and then something new comes along. These moments are exciting and a new challenge is always appreciated.
AGA-Baltic T2 Ribbon Microphone
This rare Swedish beauty came in for repair recently. Not only had I never worked one one before, I had never even heard of it! This was made by AGA-Baltic, who (according to Swedish Wikipedia) came into existence in 1928 after a merger between AB-Baltic and AGA companies. They made some rather elegant radio sets and, later, TV equipment. They clearly made microphones too.
Motor and transformer assembly from AGA microphone
From the magnet and transformer technology, I would date this as an early 1930s microphone. The motor comprises two large steel pole pieces sandwiched between four large horseshoe magnets, and it uses a massive toroidal transformer to raise the output voltage and impedance to 30 ohms. The holes around the ribbon are most likely designed to increase the high frequency response of the microphone. The only comparably sized toroidal transformer that I have seen is in the Siemens / Telefunken M201, which dates back to around 1928. Transformer technology got smaller quickly!
AGA motor after corrosion removed
The magnets in this microphone have held their field well and I measured about 2500 Gauss in the ribbon gap, which is fairly respectable for a microphone of this age. For reference, a good Melodium 42B would measure about 3000 Gauss. However, the whole motor assembly was corroded, so I stripped it down, treated with Rust-Off and then re-painted to prevent further corrosion. Everything else was cleaned and new grill cloth and mesh fitted. With old microphones that have been out of service for decades it is often best to do a complete rebuild.
AGA hardware parts being cleaned.
With a new ribbon in place the sound was weak and disappointing. The old toroidal transformer has not aged well and the transmission of high frequencies in particular was attenuated giving a dark woolly tone with a lot of noise. It also seemed to be a good aerial for picking up hum too.
Impedance matching didn't help so we were faced with the dilemma of keeping it all original or switching out the transformer and having a useful working microphone, but potentially losing some of the value to collectors.
AGA Baltic T2 - Half way back to working condition.
This situation is always a difficult choice, but after consultation with the owner we decided that the microphone should be a working studio tool, and the most sympathetic repair would be to fit a new transformer from a Coles 4038. This replacement is also a toroidal transformer so we keep the 'toroidal sound', if there is one*. (*There probably isn't.) The old transformer will of course be returned to the owner and can be re-installed in the future for collectors value.
And the results were good! The new transformers has a much better high end response, lower noise floor and does not pick up hum. The microphone is quite useable and still sounds very much like a vintage ribbon microphone. A well designed transformer should be there for impedance matching purposes and should not be contributing too much to the sound anyway.
Restored AGA-Baltic ribbon microphone
I wonder what other rare and unusual microphones are out there waiting for me? Surprises and challenges are welcome!
Last week I posted about repairing some vintage Decca London ribbon tweeters. I was confident that I had done a good job but was unable to do listening tests in context as I only had the tweeters to play with. These are now back with Andy, their owner, who kindly sent in his impressions and some photos. Overall I think we have done a good job and it's a nice feeling to have helped get these back up and running.
Decca Volt speaker with ribbon tweeter
"The [new] ribbon sounds smooth, crisp and clear with no tizz or distortion. I ran it for a while at different volumes and with different music and it sounds excellent with everything I gave it. It is very close in sound to the original in the other speaker with the soundstage being in the middle and correct. I had to try hard to notice a difference, Bob Marley's Is This Love has some high frequency cow bell drum noises and you could hear they were slightly crisper and louder from the new ribbon. The crossover point in the Volt's is about 1200hz so any imbalance between the two tweeters is easily heard as the singer tends to move off centre.
New ribbon installation at Xaudia
"I think the differences could be classed as being between an old and new ribbon the sound from them is so close. I assume as the new ribbon breaks in it will soften in sound a bit. I am tempted to switch the other new ribbon in as well.
Andy's impressive hi-fi setup.
"Considering the lack of info on the ribbons I thought getting a close match sonically was not good but it's turned out to be very close indeed. It is a huge relief to know that if a ribbon gets damaged again I can get help.
"I am not sure but you might get a lot of interest, when I was trying to find someone to repair my ribbons I came across a huge amount of forum posts on the same issue dating back about 5 years. Nobody had managed to find anyone so in theory there are a lot of ribbons to repair out there."
A long time ago I posted about the STC 4136 condenser microphone and how to modify it to work on standard 48V phantom power, using a small circuit built on perfboard.
STC 4136 microphone, in pieces.
I had another opportunity to work on one of these microphones. This one was a challenge as it had no circuit inside at all, just the capsule and bodywork, although that also gave free scope to start from scratch.
STC 4136 microphone capsule.
Space is tight in this microphone, but with a careful layout and small components everything will fit neatly. My solution for this one was to fit a small KM84 circuit and Neutrik NTE10/3 transformer. This transformer performs well, does not break the bank, and can be squeezed into tiny spaces where nothing else will go.
New circuit board and transformer
This time I commissioned a printed circuit board rather than working on perfboard, which does save time and look more professional. The board will be useful for other projects too - I have a handful of other small microphones which would benefit from updated, lower noise circuits.
Made in England
Thanks to Robert at Russell Technologies for the board layout and advice.
Decca London ribbon tweeters with huge transformers.
I have not repaired speakers in the past, but I recently had my arm twisted to look at some vintage Decca London ribbon tweeters. In theory they work in a similar manner to a ribbon microphone and should not present too much of a challenge.... right???? Anyway, it is nice to see something different on the bench and maybe I will learn something in the process.
The horn of a Decca ribbon tweeter
The first challenge was to take the speakers apart and work out what is going on inside. They have a large horn with two vents, which is is held in place with six screws. With these out of the way it is possible to remove the large, powerful magnet assembly and ribbon frame.
Brass mess behind the horn,
I received three of these ribbon tweeters but they are not all the same. Two have cast alloy horns and the third had a plastic horn. And the alloy horns have a brass grill that sits in front of the ribbon (shown above), whereas the plastic one has a nylon mesh, which would better protect against incoming metal particles.
These have large, powerful magnets
The ribbon is mounted in a square frame made from two slices of stiff material. All three frames were different and used combinations of cardboard, Tuffnol and what looks to be copper-less circuit board material. Some have silver plated ribbon mounts and others are bare copper.
Old ribbon (left) and new one waiting to be soldered.
The ribbon material in these speakers is stiffer and thicker than one would use in a microphone. The thickest foil I had in stock is 6.5 micrometer thick, supplied by Advent Research Materials, so that is what is going into these. That is about three to four times thicker than would be used in a microphone. The gap is 10mm and I cut the ribbons at 8.6mm, based on measuring a 'good' ribbon. Corrugating is routine, but the challenge here is making the electrical connection from the ribbon to the mounts. There are no ribbon clamps but I can see traces of old solder.
New ribbon in position.
Soldering thin aluminium needs a special solder and I used Alusol, which worked well after a little practice. All the contacts need to be cleaned before soldering. The solder needs quite a high temperature and you need to work quickly. To make this easier, I lightly glued the ends of the ribbon in place with nail varnish, which helped keep everything aligned. The top layer of the frame are then replaced - I used double sided tape to hold them together, and then the speaker can be re-assembled.
New ribbon as seen through the horn.
I was only had the tweeters, not the cabs or woofers, and so could not test with full range music. Instead I ran a sign wave through the speakers. They sound clear and without distortion down to about 500 Hz which is a good indicator that I have done a good job. In use they should only be working above about 7 kHz. Now they will go back to the owner for proper testing.
He discusses several vintage models in his collection, including RCA KU3, Coles, Melodium 42Bs and a nice mention of our upgraded Reslo Beeb ribbon microphones. Here are Marc's words about the Reslos.
"Speaking of Xaudia and vintage European ribbons, I also have two pairs of Reslo RBT/H 30-50 ohms Hi-Z miniature ribbon mics. Unlike the huge and super heavy Melodium, the Reslo is smaller than most dynamic mics. The Beatles (and many other bands from that era) used them as vocal mics live, giving them a bit of a cult following. Rather than on vocals, I have found that they work beautifully on string quartets—explains why I have 4 of them.
I had them equipped with the Xaudia Beeb Upgrade, which brings them back to 1961 BBC specs. The mod consists of swapping the transformer, converting the output from 50Ω to 300Ω, and reversing the motor assembly so the ribbon is closer to the front. This upgrade yields an extra 10dB of clean gain and reduces the noise of the mic, which is why these work great on strings!
Besides many lush and beautiful string quartets, I’ve also used them to re- cord the Dither Quartet—four electric guitar players who are very particular about their amp sound—and they loved these mics!"
The Syncron AU7a was one of the earliest transistorised condenser microphones, and was also sold as the Fairchild F-22. It ran on four mercury batteries, which had a tendency to leak after a few decades and are now obsolete. Conversion to run on phantom power seems sensible, but the original circuit used a P-channel JFET and positive ground, which are not compatible with modern phantom power supplies. A new circuit and a new PCB will make things a lot simpler.
Syncron AU7a - circuit for P48 operation
We tried to stay close to the original philosophy, with a single transistor circuit which re-uses the Syncron transformer (above). The Syncron microphones that I have worked on did not use a source resistor bypass cap, but I had much better results with one in place. Dan Zellerman kindly supplied a version of the schematic which shows a 470 pF bypass cap, which was absent from my microphones.
Working on these microphones is a bit of a pain because of the construction, and getting everything apart is the hardest part of this modification. The first job is to carefully remove the grill and capsule - put the capsule somewhere safe! The circuit is soldered inside a brass ring, and I needed to use a hot air gun and 80 watt iron to release that part. Some of the screws and mounting posts were also soldered in place. The transformer should be carefully removed, ready for re-use in the new circuit.
New circuit board for Syncron AU7a
The board is then populated and soldered with the exception of R5, which needs to be adjusted to bias the JFET. Either a J201 or 2N3819 will work here. To find a suitable value for the source resistor, I connected a decade box and messed around until the junction with R1 was at 12 volts. (For this example, the value if R5 was 5K1 ohms.). Another way is to hook it up to a scope and inject a sine wave, checking for highest gain and lowest distortion of the waveform, or you can even do it by ear with a pair of headphones. You'll get a similar value either way. Larger capacitors go on the reverse side of the board, along with the transformer.
Transformer side of the circuit board.
Some of the clearance is tight and care should be taken to avoid shorting to the ring that surrounds the circuit. And at some point that ring needs to be soldered to ground to ensure good shielding. I used an 80 watt iron on the outside of the ring and fed the solder in from inside. Any flux residue and other crud should be cleaned from the board when all the soldering is done. A drop of glue between the ring and board would also be sensible - be sure to keep the glue away from the high impedance components.
New AU7a circuit in place awaiting clean-up.
The capsule can now carefully be put back in position and connected to the circuit, followed by reassembly of the rest of the microphone. This updated Syncron AU7a sounds very nice and with the new circuit it has a useable output level and the signal to noise is good. The output impedance is approximately 200 ohms with the transformer secondary windings wired in series or 50 ohms if wired in parallel.
Inside the AU7a with the new circuit board.
Below is a frequency sweep compared with a Sony C48 in cardioid mode. The updated Syncron has a similar output level to the Sony.
Syncron (green) and Sony C48 (blue) responses compared.
Sony made a series of excellent large diaphragm condenser microphones, some of which have become studio classics. The earliest production model was the C37A, a tube microphone which may or may not have been used by Frank Sinatra - he has certainly been pictured with one - and it was definitely used to record the voices of Bugs Bunny and Daffy Duck. It has become sufficiently iconic for at least two clones to appear, made by Mojave and Tonelux.
On test - Sony C37p, C38b, C48 and C450
The C37P is the FET version of the C37, and is claimed to be one of the earliest production transistorised condenser microphones, although that honour is generally given to the Syncron AU7a. The C37p was followed by the C37Fet, and the C38 models. All of these microphones feature an unusual capsule design with an internal vent, which could be moved with a screwdriver from the rear of the microphone, changing the pattern from cardioid to omnidirectional. A very similar capsule is now made by Josephson Engineering, which is used in some of their own models and also rumoured to be supplied to other brands.
Sony C37 capsule - front
I am a big fan of the C38p and for the past 20 years have almost always used one for recording on my own guitar amplifier, often alongside a Shure 57 or whatever else is free after setting up for the rest of the band. The Achilles' heel of this design is that the mechanism can become difficult to turn, and many the C37s and C38s are stuck in the cardioid position. For many users that is not a problem.
Sony C37 capsule - rear view
The later C48 and C800 models use a different dual sided capsule with centre terminals, which looks similar to those used widely by Neumann (and almost everyone else.) The C48 is a versatile microphone with three available patterns, bass cut and pad switches.
Both the C38 and C48 models can run on 9V batteries and use a DC converter inside the microphone to generate the polarisation voltage for the capsule. These converters are tricky to repair when they fail.
Sam Inglis & I recently had an opportunity to compare a few Sony condenser microphones to see how they had evolved over time. On the day of testing we had access to a pair of C37p, one C38b, a C48 and a C450. In addition we looked at a Josephson C705 for comparison.
By comparing the microphones we hope to discover how these Sony LDC mics compare and are the new ones better than the old ones (or vice versa)? Does the capsule hold the key to the Sony sound, if there is indeed such a thing? And are the new capsules from Josephson good copies of the old Sony C37/C38 capsules?
As usual, the frequency sweeps are good for comparison purposes but are run in a small booth and should not be considered absolute measurements. The reference microphone is omnidirectional, which can cause a few inaccuracies when testing cardioid transducers. The dip around 12K is an artefact. Measurements were made at 30 cm distance from a concentric speaker. Measurements were made with a swept sine measurement and recorded using Fuzzmeasure Pro.
1. Comparison of C37p, C38b and C48
Comparison of C37p (lowest), C38(middle) and C48 (top)
As one would expect, the major change between models is the increasing output level (and signal to noise). The C37p is a very early transistorised microphone and transistor technology changed rapidly in those early years. It has a nice sounding bass proximity boost, and the mic is equipped with four EQ settings marked M, M1, V1 and V2 to compensate. (M is the unfiltered output). The two C37s that we tested were very close, which is reassuring.
I own a C38b which I use it for my own recordings, and my perception is of a warm sounding microphone, without a harsh or hyped top end. I was surprised to see that it has a bit more of a top end lift than its predecessor. It carries the M, M1, V1 and V2 settings through from the C37 and also adds a high cut switch. The M1 position acts as a high pass filter whereas the 'V' or vocal positions are more like a long shallow shelf.
C38b filter - M (red), M1 (blue) and V1 (green)
And the C48 is louder again. This is a more conventional multi-pattern microphone with electronic switching between cardioid, omni and figure-8. It also has bass cut and pad switches which are accessible via a sprung panel on the rear of the microphone.
In my experience the C48 is a top quality recording tool and makes a good alternative to a U87 - I know a few engineers who prefer it to the Neumann. Barkley McKay at Valleywood Studios said "one of the reasons I like the 48 is it’s gentle roll off before 16k - it’s a little like an enhanced ribbon."
2. C48 vs C450
Sony C450 capsule, front.
The C450 is a less well known model which looks a lot like the C48 but with some cheesy 1980s stickers applied. However, the C450 has a smaller capsule, around 24mm diameter, and runs on a single 1.5V battery. We have not discussed or measured the C500 here because I don't have access to one, but I have a hunch that this is a similar size to the capsule in that model. Can anyone confirm that or share a picture of their C500?
Sony C450 capsule - rear
The C450 has an average output level around 11 dB lower than the C48, but is significantly brighter at the top end. It is equipped with high pass filter and -10dB pad switches, although you won't need the pad very often! The noise level is also a bit disappointing. It probably has a role on the right sound source but I haven't found it yet.
Frequency sweeps of C48 (top) and C450 (bottom)
3. Does the Josephson C705 sound like a better C37?
Josephson C705 in the testing booth at Xaudia
The Josephson C705 is an excellent microphone with a reassuringly solid feel, and does indeed sound much like a good C37p, albeit 12 dB louder and with an even better improvement in signal to noise. It is a transformerless circuit and is cardioid only (like a lot of C37 and C38 once the capsule becomes stuck!). It lacks the high pass filter options of the Sony microphones. The C705 it is not trying to be a clone or tribute in any kind of cosmetic sense. I admire Josephson because they do their own thing and try to make the best products they can. In this case they have done some clever things with the grill and acoustic environment around the capsule, moving the vertical support struts further back out of the way of the cardioid capsule. At around £2500 this is not a cheap option, but is a professional recording tool which will get you close to the Sony C37 sound.
Sony C37p (purple) and Josephson C705 (green)
One final thought - Whilst doing some background reading for this post, I found that the older Sony mics were not highly regarded on internet forums back in the early 2000s, compared to Neumann and AKG. Here is a certain Mr K,.H.'s informed opinion..
"I never liked the C37A all that much, and would put it into the category "Post War Japan makes good" (as in their tiny late 1950s sports cars patterned after Fiats.) The C37A always struck me as a poor cousin of a ....?? Neumann mic: pretty poor craftsmanship, akin to what the Russians did in the 1970s; not much personality, pretty bad tube choice, cathode follower circuit with its associated gain and dynamic problems, etc... ...and then Sony went downhill from there with its FET mics... so I think."
I disagree. And the first thing I will do when I die and go to heaven or hell or Valhalla will be to march up to Frank Sinatra and ask him if he really did use a C37a!