Beyer sell replacement motors which allow repair of some of their microphones although the cost in the uk is rather high. Swapping the motor is a bit fiddly but can be done with patience and care. This is more or less how I do it, although the models do vary a bit and you may need to improvise.
.jpeg) |
| Beyer M160 motor with rounded edges (left). |
First note that Beyer motors may have round or square edges at the rear of the magnets. For many microphones this won't matter, but the M160 grill will only accept motors with rounded magnets. In the picture above it looks rather crude like it was rasped down with a file! It is probably possible to make a square edged motor fit an M160 but the magnetic filings would surely wreck the ribbon,
Also worth mentioning is that Beyer M160 and 130 have two ribbons whereas M260s have a single ribbon.
To exchange the motor, first one needs to remove the socket and unsolder the connector and transformer. The socket may be glued, screwed and/or pinned in place. Remove the screws or pin. If the socket does not slide out then it is glued and will need heating until the glue fails. Do this at your own risk!
Then unsolder the socket, remove any rubber grommets and unsolder and remove the transformer.
 |
| Beyer M260 with socket and transformer removed |
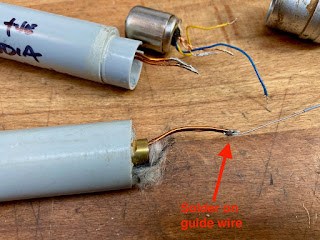
The next job is to pull the motor through the acoustic labyrinth but keep in mind that you will need to reverse the process in a few minutes. I usually solder an extra piece of wire into the end of the motor leads which will let me pull the new motor wires back into place.
 |
| Remember to solder on a guide wire before you remove the motor |
Once this is done you can pull the motor out and then unsolder, leaving the new wire in place.
 |
| Pull the motor and guide wire through the body |
Unsolder the old motor and then reverse the process. Solder the new motor wires onto the guide wire, pull through the labyrinth and then unsolder. That parts is easier said than done because you are pulling some stiff wires around a bend that you can't see. Reattach the transformer and socket.
The only job left to do is to check the polarity of everything. Beyer do not always colour code their wires so you have to guess. Compare the microphone to a good modern mic. If your repaired Beyer is out of phase then simply reverse the wires at the XLR or din plug.
As a final warning, I have found that Beyerdynamic parts vary a lot and they do love to glue stuff together - why spend money on a screw or two when a tube of glue will do? Be prepared for a certain amount of frustration and keep the swear-box to hand.


No comments:
Post a Comment
Post a comment!
Note: only a member of this blog may post a comment.