
2011/04/13
2011/03/31
MOTM: Shaftesbury Velodyne Supreme


The output of a ribbon mic will scale in proportion to the length of the ribbon, at least up to a point. The idea behind the Velodyne was to give increased output by using a super-long ribbon. Normally that wouldn't give you as high an output as it should, because of 'rippling', or other incoherent vibrational modes. But by fixing the ribbon in multiple places they claim to avoid this problem. The microphone was sufficiently novel at the time for the inventors to apply for protection.


I wonder how well it worked? Sadly we may never know. The ribbon is broken in many places, and is glued down, so it will net be an easy thing to replace. I'm still struggling over whether to try and get this working or not. I suspect it really ought to be left in its historic condition, but I am curious about how it would have sounded.
Postscript: History shows that this design was not a success. Whether this was for sonic or economic reasons, we can only speculate, but Shaftesbury appear to have abandoned the concept. Their later ribbon microphones were a much more conventional affair, like this Shaftesbury RT model - ribbon, magnets and transformer.


2011/02/22
Mic of the Month - Zephyr 30RA high impedance ribbon mic
February's MOTM is a ribbon microphone made by Zephyr, of Australia. It's nice to see a microphone that begins with the letter Z!

The mic has a very "retro sci-fi" look, with hammerite paint and a punched metal grill. The name plate reads "High fidelity velocity microphone type 30RA, but despite the misleading model number, the mic is actually a high impedance mode, and the output transformer is marked "50K'.

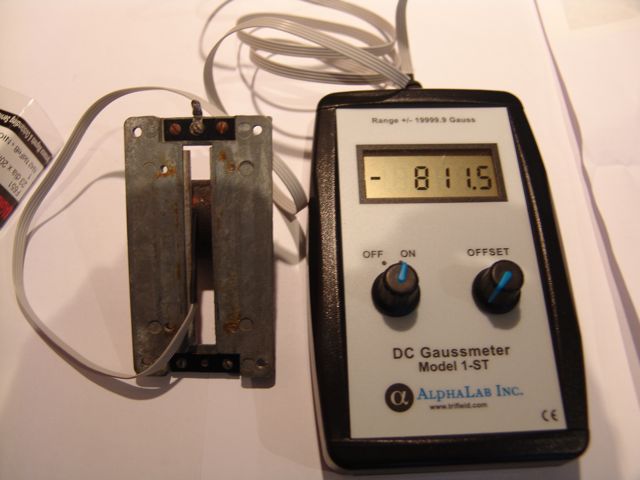
The magnets are still healthy on this one, kicking out around 2500 Gauss between the pole pieces. The ribbon is 2.5 mm wide and 28 mm long, similar in scale to a Reslo RBL or Grampian microphone.

The back of the ribbon element is covered in lots of felt, to stop air blasts and brighten the mic for vocal use. Removing some of this opens the sound up a bit. This beast was probably intended for use with a home tape recorder, and would have worked very nicely in that application.

The ribbon itself is mounted on a removable plastic saddle, which makes servicing very simple. Which is a good thing, because this one is stretched. This idea is also seen on Reslo and other microphones.
With a new ribbon, and a suitable impedance-matching buffer, the microphone sounds rich and full - well worth the time spent to get it up and running again.

The mic has a very "retro sci-fi" look, with hammerite paint and a punched metal grill. The name plate reads "High fidelity velocity microphone type 30RA, but despite the misleading model number, the mic is actually a high impedance mode, and the output transformer is marked "50K'.

The magnets are still healthy on this one, kicking out around 2500 Gauss between the pole pieces. The ribbon is 2.5 mm wide and 28 mm long, similar in scale to a Reslo RBL or Grampian microphone.

The back of the ribbon element is covered in lots of felt, to stop air blasts and brighten the mic for vocal use. Removing some of this opens the sound up a bit. This beast was probably intended for use with a home tape recorder, and would have worked very nicely in that application.

The ribbon itself is mounted on a removable plastic saddle, which makes servicing very simple. Which is a good thing, because this one is stretched. This idea is also seen on Reslo and other microphones.
With a new ribbon, and a suitable impedance-matching buffer, the microphone sounds rich and full - well worth the time spent to get it up and running again.
2011/02/21
New workshop part 2: Construction Time Again
After a morning with glue and a staple gun, sticking acoustic foam to the soft walls, our new microphone testing chamber is up and running. Here are a couple of photos....

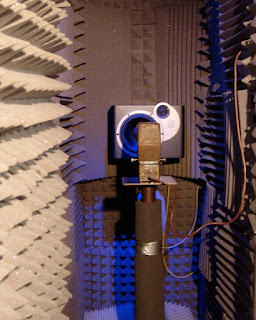
The chamber is hooked up to pink noise and swept-sine equipment, and can collect a frequency plot in a matter of seconds. I'm still working on validation, testing different speakers and mics for best performance, but the facility is already proving its worth.


The chamber is hooked up to pink noise and swept-sine equipment, and can collect a frequency plot in a matter of seconds. I'm still working on validation, testing different speakers and mics for best performance, but the facility is already proving its worth.
2011/02/14
New workshop! (part 1)
It's been a quiet month so far for blogging, but a busy one at Xaudia.
We've spend the last week building a new microphone workshop in the basement below the studio, including an 'anechoic' isolation booth for mic testing. Ralph & Jane have been helping out with building and painting.
Here's the empty room, waiting to realise its potential:
 Wall going up...
 A door, window and a slap of paint
 Isolation booth and test and measurement area...
 And with the test gear going in:
 The door on the left is an isolation / semi-anechoic box for testing mics or punishing drummers. The sound treatment is on order.

Anyway, loads left to do....
Click here for part 2.
We've spend the last week building a new microphone workshop in the basement below the studio, including an 'anechoic' isolation booth for mic testing. Ralph & Jane have been helping out with building and painting.
Here's the empty room, waiting to realise its potential:


Anyway, loads left to do....
Click here for part 2.
2011/01/11
Thread Adapters for RCA, Sony and other microphones
 |
| RCA to modern mic stand thread adapter |
So we decided to make some.
These fit most of the 'big' vintage RCA microphones, including the 44, 74b and 77 ranges, and also are perfect for Sony professional mics, including the C38b, FV300 and C48 microphones. They also fit Syncron AU7A / Fairchild F22 microphones, and several other American and Japanese microphones with a large thread.
Update:
These are now for sale on the Xaudia website priced at £6.00.
If you want one, please get in touch.
2011/01/09
Japanese Auction Poetry
Unintended poetry, via translation of a Japanese auction.
It is a rare thing. It is a microphone,
I kept it as collection with a thing handed over before,
The movement had sound then.
But the measurement performance in the new thing is unidentified,
Because I do not make the measurement whether you appear,
Attached to the measurement data of 43 years and 44 years.
The one that has, thanking you in advance,
The one that I want even as for such thing, thanking you in advance,
Because there are a wound and a scratch.
Please understand used goods and ask after above contents,
Understanding in clay,
I do the question as far as I understand it, but answer.
It is communication after the end, but contacts the first on the next morning,
Sorry by a private affair, but thanking you in advance,
Of the one that I am very sorry, but new one and evaluation remarkably have worse.
I will delete, although being really selfish,
In addition, if communication seem to be three days late, please let me know,
I cancel it and I do it.
It is measured for there to be many successful bids of the one,
Where I cannot totally accept communication recently,
Be heated, and there is not it with the state of things really anymore.
But please understand it, and that which I never want,
Please let me know because I do not mind a question and a business,
In addition, please let me know when communication becomes slow.
I am really selfish, but approve it.
Unintentionally written by Coldbreak9, 2011
False Economy a.k.a. "I can't afford to buy cheap."
Here's a little lesson that I learned (again) recently. Buying cheap, used equipment can cost just as much, or more, than buying new.
I recently found an ElectroVoice PL20 microphone for sale on a forum for $200, which translates as about £130. The PL20 is exactly the same (apart from the colour) as the much loved RE20, which is a perfect choice for recording drums, bass, vocals, brass and many other instruments. Considering that these microphones generally go for around £400 here in the UK, I thought I would grab a bargain for our studio. Even with transatlantic postage, duty, and maybe some small repairs, I should come out ahead of the game, right?
WRONG!
The first thing that arrived was a letter demanding a whopping payment of duty and handling for the import.
On unpacking I noticed that the microphone rattled - the capsule was loose. This is actually a common fault with these microphones - the foam disintegrates and the capsule becomes loose. Luckily, replacement foam is available for a small charge from Shuttlesound. I ordered a kit and it arrived the next day.
Time for surgery: Here is an excellent photo-journal showing how to open up an RE20.
 The mic comes apart easily - you need to unscrew the XLR connector at the bottom (note the screw turns counter-intuitively), and unsolder it , then undo the hex nut behind it. This reveals the wiring which can be fed through the mic body so the capsule may be withdrawn.
Also remove the grill, which will unscrew once a small grub screw has been removed. On this mic the hexagonal hole had been stripped round, and so I had to carefully drill this out and re-tap the thread.
 With the mic apart I unsoldered the capsule, cleaned out dirt and deteriorated foam, and then put it all back together again with the new foam for testing.
The capsule was no longer loose, but the mic still rattled! Something was broken inside the capsule assembly.
 I took it apart again and took the top cover off the capsule. Inside I could see that the small black baffle behind the diaphragm had become unglued. This is not good - it can't be reached without removing the diaphragm, and this is like brain surgery.
With nothing to lose, I carefully unsoldered and removed the diaphragm with a scalpel, then re-glued the baffle and reversed the process, and tested. Sadly the 'repaired' capsule had low bass response. It was time to admit defeat and order a new capsule, which did indeed solve the problem. The mic is now back to full working order, and sounds just like the other RE20s.
Total cost:
'Bargain' microphone: £130
International postage: £25
Duty and handling £49!
New foam set + delivery + VAT: £23
New capsule + VAT: £167
+ a couple of hours ordering and fitting bits.
Total = £394
For reference, Thomann.de sell a package for £399 which includes an RE20, a stand and 10M cable.
Lesson learned.... at least for now.
Oh, and the mic stand clip is missing....
 |
| RE20 microphone in the Xaudia studio |
WRONG!
The first thing that arrived was a letter demanding a whopping payment of duty and handling for the import.
On unpacking I noticed that the microphone rattled - the capsule was loose. This is actually a common fault with these microphones - the foam disintegrates and the capsule becomes loose. Luckily, replacement foam is available for a small charge from Shuttlesound. I ordered a kit and it arrived the next day.
Time for surgery: Here is an excellent photo-journal showing how to open up an RE20.

Also remove the grill, which will unscrew once a small grub screw has been removed. On this mic the hexagonal hole had been stripped round, and so I had to carefully drill this out and re-tap the thread.

The capsule was no longer loose, but the mic still rattled! Something was broken inside the capsule assembly.

With nothing to lose, I carefully unsoldered and removed the diaphragm with a scalpel, then re-glued the baffle and reversed the process, and tested. Sadly the 'repaired' capsule had low bass response. It was time to admit defeat and order a new capsule, which did indeed solve the problem. The mic is now back to full working order, and sounds just like the other RE20s.
Total cost:
'Bargain' microphone: £130
International postage: £25
Duty and handling £49!
New foam set + delivery + VAT: £23
New capsule + VAT: £167
+ a couple of hours ordering and fitting bits.
Total = £394
For reference, Thomann.de sell a package for £399 which includes an RE20, a stand and 10M cable.
Lesson learned.... at least for now.
Oh, and the mic stand clip is missing....
2011/01/08
Mic Of The Month: Sony F-V300 Dynamic microphone
 |
| Sony F-V300 and C38b microphones |


This example has some traces of foam around the element, indicating that an internal windshield has at some time been removed.
The label states that the mic is nominally of 1kΩ impedance, although in practice seems lower than this and it has no problems driving standard low-Z microphone preamps. The output is strong and clear across the range, and the output is similar in level and detail to a healthy EV RE20, although with a more pronounced proximity effect.
As far as we know, this microphone was only marketed in Japan, but if you have any information to confirm or deny this, or in fact any information about this mic at all, please let us know!
UPDATE 22/2/11
This microphone has become a bit of a favourite for guitar cabs - it seems to have just the right amount of proximity boost for that application, giving clear and solid presence to the lower end. It also makes a decent tom mic.
2011/01/07
Strange things you find inside ribbon mics (part 1)
Microphone ribbons are generally made from very thin metal foil, and aluminium is the ideal material as it is very light but also very conductive. The output of the microphone is inversely proportional to mass, and so a thicker, heavier ribbon will give a lower output, and a thin light ribbon will be more sensitive. Many manufacturers use something typically around 0.0001 inch or 2 microns in thickness. The ribbon is also typically corrugated either along the full length to prevent lateral motion, or at the ends to give a 'piston' style of ribbon. Well, that is how it should be.
However, ultra-thin aluminium is hard to get hold of, and the non-specialist may be tempted to make repairs using materials that are more readily available. Here are some things I have found inside microphones masquerading as ribbons - needless to say they were all replaced with good quality aluminium foil of an appropriate thickness!
1. Cigarette Paper.
 This microphone actually worked, to an extent! It at least made a sound. The ribbon was made from an old fag packet.
Cigarette packs used to come lined with paper-backed foil - I've never been a smoker so I don't really know why, but I imagine for freshness or something. The foil is thin and already textured - it just needs to be separated from the paper. Actually this last part seems to be optional, and sometimes bits of paper are still attached, making the ribbon heavy and noisy.
1.b I've heard that chewing gum wrappers were also used for redneck ribbons, if you want a minty fresh microphone.
1.c Here's a lovely example of cigarette paper being used for a ribbon in an old GEC microphone.

2. Kitchen Foil
Kitchen foil is easy to handle, yet much too thick to make a decent ribbon. But that doesn't stop people trying. This is a common ebay trick... the ribbon looks in good condition, but when the mic arrives the output is low and sounds crunchy.
3. Sweet Wrappers
 Plastic coated foil or metallised plastic, like that found in sweet wrappers is an interesting innovation, but is generally too heavy and has too high a resistance to make a decent ribbon. Also the plastic doesn't conduct. This microphone gave almost no signal, and it isn't hard to see why.
However, ultra-thin aluminium is hard to get hold of, and the non-specialist may be tempted to make repairs using materials that are more readily available. Here are some things I have found inside microphones masquerading as ribbons - needless to say they were all replaced with good quality aluminium foil of an appropriate thickness!
1. Cigarette Paper.

Cigarette packs used to come lined with paper-backed foil - I've never been a smoker so I don't really know why, but I imagine for freshness or something. The foil is thin and already textured - it just needs to be separated from the paper. Actually this last part seems to be optional, and sometimes bits of paper are still attached, making the ribbon heavy and noisy.
1.b I've heard that chewing gum wrappers were also used for redneck ribbons, if you want a minty fresh microphone.
1.c Here's a lovely example of cigarette paper being used for a ribbon in an old GEC microphone.

2. Kitchen Foil
Kitchen foil is easy to handle, yet much too thick to make a decent ribbon. But that doesn't stop people trying. This is a common ebay trick... the ribbon looks in good condition, but when the mic arrives the output is low and sounds crunchy.
3. Sweet Wrappers

2010/12/21
Microphone of the Month - Philips Ribbon Mic

This old microphone by Philips came from a seller in Egypt - I have a vision of it being used back in the 1940s and 50's, broadcasting out in the desert, near the Pyramids and Sphinx....
The mic was in pretty bad shape and in need of a full restoration. The ribbon was broken, and it was missing a yoke and several other parts. However, it's a pretty interesting microphone and so gets to be our microphone of the month for December.

The magnetic field is provided by one large permanent barrel magnet. This microphone had a measured field of about 1200 Gauss between the poles, with ribbon dimensions of 5.5 mm wide by 67 mm long.


I haven't seen another one like this - either in life or on the web. If you have any further information on this, I'd love to hear from you.
2010/12/02
Fun with magnets and an Electrovoice V1 velocity ribbon mic

Bob Crowley has a few things to say about these mics - not all of them nice!
The motor of this model is based on a single cylindrical permanent magnet, clamped to a pair of metal plates which make up the pole pieces of the assembly. Because of the positioning of the magnet, the magnetic field is uneven, with a significant difference in field between the top and bottom of the motor assembly. In our example we found that the field varied from around 700 gauss at the bottom to 1000 gauss at the strongest point. This is very low for a ribbon mic, and, along with the oxidised ribbon is responsible for a low, noisy output.


2010/12/01
Cat Mac Attack!
Pansy the cat has got it in for the MacBook, and launches surprise attacks like this, usually whilst I'm writing an important email, a blog entry, or leaving feedback on ebay.
At least it explains the spelling!
2010/11/28
Winter is here! And so are Modern Day Chicane.

This was the scene at Xaudia studio yesterday - a beautiful cold, crisp and bright day in North Yorkshire, and it's times like this you really appreciate the peace & tranquility we get here. Ideal for creativity and recording. And this was the view from the studio over the surrounding fields.


I went home and lit the fire!
2010/11/25
Mic of the Month - RCA Junior ribbon mics
October was a bad month for blogging - I was busy with the haunted house sound installation, and this was compounded by a fault with my Macbook, which took the Apple repair centre three weeks to find and fix, a long time to track down a faulty cable. With a microphone, that would be the first thing to check! Amongst all the chaos I completely forgot to do the 'mic of the month' column.

Back in the real world, I have chosen the RCA Junior ribbon for November's Mic of the Month. This is because they seem popular at the moment, and we've seen four at the workshop for service or repair. The fun thing about this family of microphones is that they vary somewhat in construction, so it is possible to compare and contrast versions from different eras. They tend to be a bit more affordable than the bigger RCA 44 and 77 mics, but still have a good tone that is very usable in a modern studio, especially if the ribbon is in good condition and the transformer is healthy and wired correctly.

The 'Junior' was created as a budget version of the RCA44, with a similar motor assembly but smaller magnets and housing. The most commonly seen models are the 'black badge' and 'red badge' versions, and these are actually quite different inside - the black badge model has a 3.0 mm x 55 mm ribbon, whilst the red badge version I examined has a wider, 4.5 mm ribbon and a stronger magnetic field.

The output transformers on these microphones can be set for 50 Ohm, 250 Ohm or 10KOhm output impedance, and it is worth checking that the mic is wired correctly to get the best performance with modern studio equipment. Normally that will be the 250 ohm setting.

Finally, some RCA mics were actually made in Europe, and it would seem that some appear under different names. The microphone on the left is badged as 'Magneti Marelli, Milano, Italy' but is almost identical to the black badge RCA 74b. The only difference is that the Magneti has an alternative transformer, but still with high and low impedance options. The sound is every bit as good.

We'd love to hear from anyone who knows more about the Magneti Marelli microphones and their relationship with RCA.
(Thanks to Jules at DADA Studios in Belgium and Jørn Christensen at Rodeløkka Studio in Norway.)

Back in the real world, I have chosen the RCA Junior ribbon for November's Mic of the Month. This is because they seem popular at the moment, and we've seen four at the workshop for service or repair. The fun thing about this family of microphones is that they vary somewhat in construction, so it is possible to compare and contrast versions from different eras. They tend to be a bit more affordable than the bigger RCA 44 and 77 mics, but still have a good tone that is very usable in a modern studio, especially if the ribbon is in good condition and the transformer is healthy and wired correctly.

The 'Junior' was created as a budget version of the RCA44, with a similar motor assembly but smaller magnets and housing. The most commonly seen models are the 'black badge' and 'red badge' versions, and these are actually quite different inside - the black badge model has a 3.0 mm x 55 mm ribbon, whilst the red badge version I examined has a wider, 4.5 mm ribbon and a stronger magnetic field.

The output transformers on these microphones can be set for 50 Ohm, 250 Ohm or 10KOhm output impedance, and it is worth checking that the mic is wired correctly to get the best performance with modern studio equipment. Normally that will be the 250 ohm setting.
The earliest and rarest version, the MI-4010-A, is shown on the right in the picture below. It is slightly larger than the later versions, with a different ribbon assembly which has horseshoe style magnets around the back of the ribbon. The magnetic field in this example is weaker, and the output lower than the more modern versions, although the tone with a new 1.8 micrometer ribbon is very pleasing.

Finally, some RCA mics were actually made in Europe, and it would seem that some appear under different names. The microphone on the left is badged as 'Magneti Marelli, Milano, Italy' but is almost identical to the black badge RCA 74b. The only difference is that the Magneti has an alternative transformer, but still with high and low impedance options. The sound is every bit as good.

We'd love to hear from anyone who knows more about the Magneti Marelli microphones and their relationship with RCA.
(Thanks to Jules at DADA Studios in Belgium and Jørn Christensen at Rodeløkka Studio in Norway.)
2010/11/16
Drew Stephenson - A Driven Man is (Finally) Here

Support comes from Dan Webster.
Do come and join us if you can.
2010/11/02
Sounds from the halloween maze

The big 'Hallowscream' event at York Maze is now over for the year, and the guys and girls are now hurridly getting ready for Guy Fawkes night. It's a quick turn around so good luck!
Several people asked to hear the sounds that we 'created' for the two Halloween haunted houses. I took most of the sounds from the Freesound Project, which is a very handy searchable library of sounds, most of which are available through the Creative Commons license scheme. Other sounds used were my own creations.
The creepy clown theme for the 'CarnEvil' haunted house was based on a loop from The Midnight Syndicate, who specialise in music for haunted house and similar attractions. Some of their tracks were also used for background music in the theatre area.
I'll leave these tracks up for a week or so, so grab them quickly. Enjoy!
Carnevil Haunted House
Boiler Room
2010/10/31
Halloween? Hallowscream
For a change, I have spent most of October fitting speakers and providing the sounds for the Halloween events at York Maze close to our studio, and now it's all up and running - we had over 1000 people through the gate last night and are expecting even more this evening. The two haunted houses are excellent scary fun, and the creepy clown music will worm its way into your brain and keep you up all night.
A couple of people have asked for clips of the music from the haunted houses, and I'll try to post those up tomorrow.
Subscribe to:
Posts (Atom)
